<tr>
<td valign="top" nowrap="yes">
<table width="100%" cellpadding="0" cellspacing="1">
Sau chèn bảng trong tài liệu kết quả, sự chuyển đổi sẽ tạo ra những đầu mục bảng mỗi phần tử <list.column> trong tài liệu XML.
<tr bgcolor="a0a0a0" style="padding:2px;spacing-top:0px">
<td width="1%" class="text" align="center">
<img src="images/envelope.gif" width="16"/>
</td>
<xsl:for-each select="list.columns/list.column">
<td class="text" align="center" style="color:black; font-weight:bold">
Có thể bạn quan tâm!
-
 Xây Dựng Giao Diện Người Sử Dụng Dựa Vào Xml.
 -
 Lập trình web nâng cao XML - Trường CĐN Đà Lạt - 10
 -
 Lập trình web nâng cao XML - Trường CĐN Đà Lạt - 11
 -
 Lập trình web nâng cao XML - Trường CĐN Đà Lạt - 13
 -
 Lập trình web nâng cao XML - Trường CĐN Đà Lạt - 14
 -
 Lập trình web nâng cao XML - Trường CĐN Đà Lạt - 15
Xem toàn bộ 258 trang tài liệu này.
<xsl:value-of select="list.column.description"/>
<xsl:variable name="sort-dir" select= "list.column.sortdirection"/>
<xsl:if test="($sort-dir = 'asc')">
<img src="images/up.gif" hspace="4"/>
</xsl:if>
<xsl:if test="($sort-dir = 'desc')">
<img src="images/down.gif" hspace="4"/>
</xsl:if>
</td>
</xsl:for-each>
</tr>
Sự biến đổi rồi áp dụng những mẫu về sau vào tập hợp list.children để phát sinh thân bảng. Cuối cùng mẫu list gắn một phần chân vào bảng để qui định một tổng hợp của những hàng liệt kê.
<xsl:apply-templates select="list.children"/>
</table>
</td>
</tr>
<tr bgcolor="e0e0e0">
<td class="text">
<xsl:variable name="childrencount" select="count (.//list.item)"/>
<xsl:if test="$childrencount=1">
<xsl:value-of select="$childrencount"/> item
</xsl:if>
<xsl:if test="$childrencount!=1">
<xsl:value-of select="$childrencount"/> items
</xsl:if>
</td>
</tr>
</table>
</xsl:template>
Công việc của mẫu list.item là xây dựng một hàng bảng cho mỗi phần tử <list.item> trong tài liệu. Những vòng lặp mẫu qua tập hợp list.columns, định vị một list.property với một tên thích ứng, lấy giá trị của nó từ phần tử <list.property.value> vào điền vào trong một tế bào bảng các giá trị đó. Mẫu cũng bao gồm những quy tắc để quản lý những biểu tượng và siêu liên kết nhúng.
<xsl:template match="list.item">
<xsl:variable name="current-item" select="."/>
<xsl:variable name="current-row" select="position()"/>
<xsl:variable name="id" select="concat('v',generate-id())"/>
<tr>
<xsl:choose>
<xsl:when test="position() mod 2">
<xsl:attribute name="style"> background-color:ffffff
<xsl:if test="count(ancestor::list.group) > 0">
;display:none
</xsl:if>
</xsl:attribute>
</xsl:when>
<xsl:otherwise>
<xsl:attribute name="style"> background-color:f1f1f1
<xsl:if test="count(ancestor::list.group) > 0">
;display:none
</xsl:if>
</xsl:attribute>
</xsl:otherwise>
</xsl:choose>
<xsl:attribute name="id"><xsl:value-of select="$id"/>
</xsl:attribute>
<td class="text" align="center" valign="top">
<xsl:variable name="iconurl" select="ancestor::list/icon"/>
<xsl:choose>
<xsl:when test="icon and icon != ''">
<img width="16" height="18"><xsl:attribute name="src"> images/<xsl:value-of select="icon"/></xsl:attribute></img>
</xsl:when>
<xsl:otherwise>
<img width="16" height="18"><xsl:attribute name="src"> images/<xsl:value-of select="$iconurl"/></xsl:attribute></img>
</xsl:otherwise>
</xsl:choose>
</td>
<xsl:for-each select="ancestor::list/list.columns/list.column">
<xsl:variable name="current-property" select="list.column.name"/>
<xsl:variable name="current-datatype" select= "list.column.datatype"/>
<xsl:variable name="current-position" select="position()"/>
<xsl:variable name="last-position" select="last()"/>
<xsl:variable name="current-description" select= "list.column.description"/>
<xsl:for-each select="$current-item/list.property [list.property.name=$current-property]">
<td class="text" valign="top">
<xsl:attribute name="title"><xsl:value-of select= "$current-description"/>: <xsl:value-of select="list.item.value"/>
</xsl:attribute>
<xsl:choose>
<xsl:when test="($current-datatype = 'numeric' or
$current-datatype='monetary' or $current-datatype='date' or
$current-datatype='percentage')">
<xsl:attribute name="align">right</xsl:attribute>
</xsl:when>
<xsl:otherwise>
<xsl:attribute name="align">left</xsl:attribute>
</xsl:otherwise>
</xsl:choose>
<xsl:if test="list.property.value">
<xsl:choose>
<xsl:when test="list.property.href != ''">
<xsl:element name="a">
<xsl:attribute name="href"><xsl:value-of select="list.property.href"/></xsl:attribute>
<xsl:value-of select="list.property.value" disable-output-escaping="yes"/> 
</xsl:element>
</xsl:when>
<xsl:otherwise>
<xsl:value-of select="list.property.value" disable-output-escaping="yes"/> 
</xsl:otherwise>
</xsl:choose>
</xsl:if>
</td>
</xsl:for-each>
</xsl:for-each>
</tr>
</xsl:template>
Mẫu list.group được viết để quản lý nhóm n-level trong một danh sách. Mẫu giả thiết rằng tất cả các mục chọn trong danh sách đã được nhóm lại trước sự chuyển đổi. Bởi vậy, một chương trình khác nhau phải được được nhóm lại.
<xsl:template match="list.group">
Hàng sau đây xác định nhiều để cách nhau bạn như thế nào cần phải sử dụng khi lõm xuống những hàng tổng hợp nhóm.
<xsl:variable name="padding" select="20 * count(ancestor::list.group)"/>
<xsl:variable name="id" select="concat('v',generate-id())"/>
Khung mẫu kế tiếp tạo ra một hàng để trình bày thông tin tóm lược nhóm. Thuộc tính kiểu hiển thị hàng được đặt thành none nó là một đứa trẻ của list.group khác. Một dấu cộng được chèn vào trong hàng, khi được kích, nó sẽ mở rộng nhóm và hiển thị các con của nó. (Mã JavaScript để làm điều này sẽ được liệt kê đi theo sau sự chuyển đổi này.)
<tr>
<xsl:attribute name="id"><xsl:value-of select="$id"/></xsl:attribute>
<xsl:if test="ancestor::list.group">
<xsl:attribute name="style">display:none</xsl:attribute>
</xsl:if>
<td>
<xsl:attribute name="id"><xsl:value-of select="$id"/>_plus
</xsl:attribute>
<xsl:attribute name="colspan"><xsl:value-of select="1 + count(ancestor::list/list.columns/list.column)"/></xsl:attribute>
<table width="100%" cellpadding="0" cellspacing="0" border="0" class="listgroup">
<xsl:attribute name="id"><xsl:value-of select="$id"/>_table
</xsl:attribute>
<tr>
<xsl:if test="$padding != 0">
<td>
<xsl:attribute name="width">
<xsl:value-of select="round($padding)"/></xsl:attribute>
<xsl:attribute name="style">background-color:727272
</xsl:attribute>
<img src="images/spacer.gif" height="1">
<xsl:attribute name="width">
<xsl:value-of select="round($padding)"/></xsl:attribute>
</img>
</td>
</xsl:if>
<td width="5" style="cursor:hand">
<img src="images/plus.gif" hspace="4" style="border:1px outset">
<xsl:attribute name="onClick">ExpandCollapse('<xsl:for-each select="list.children/*[name() = 'list.group' or name() = 'list.item']">
<xsl:value-of select="concat('v',generate-id())"
/><xsl:if test="last() > position()">,</xsl:if></xsl:for-each>','<xsl:value-of select="$id"/><xsl:for-each select=".//*[name() = 'list.group' or name() = 'list.item']">,
<xsl:value-of select=
"concat('v',generate-id())"/></xsl:for-each>')</xsl:attribute>
<xsl:attribute name="id"><xsl:value-of select="$id"
/>_plus_image</xsl:attribute>
</img>
</td>
Thông tin tóm lược, kể cả sự mô tả thuộc tính, giá trị và sự đếm mục chọn, được chèn vào trong tài liệu kết quả. Cuối cùng khung mẫu gọi Tới <xsl:apply-templates> để chuển đổi những nút con list.item và list.group.
<td align="left" class="text">
<xsl:value-of select="list.group.description"
/> : <xsl:value-of select="list.group.value"/>
<xsl:variable name="childrencount" select="count (.//list.item)"/>
<xsl:if test="$childrencount=1">
(<xsl:value-of select="$childrencount"/> item)
</xsl:if>
<xsl:if test="$childrencount>1">
(<xsl:value-of select="$childrencount"/> items)
</xsl:if>
</td>
</tr>
</table>
</td>
</tr>
<xsl:apply-templates select="list.children/*"/>
</xsl:template>
Sự cài đặt dựa trên bảng của hàm hiển thị dựa trên phần tử <div> bởi vì phần tử <div> hiển thị theo thối, các thuộc tính của chúng được kế thừa bởi tất cả con cháu của chúng.
Như đã hứa, hàm javascript expandCollapse() sẽ có chức năng mở và đóng những nhóm bảng. Chức năng này được chèn vào trong tài liệu bởi XSLT đã thấy trước đó.
function ExpandCollapse(c1,ca) { var ca_a = ca.split(',');
var c1_a = c1.split(',');
c1 = document.getElementById(ca_a[1]); if (c1.style.display == 'none')
expand = true; else
expand = false;
thePlus = ca_a[0]+"_plus_image";
plus_div = document.getElementById(thePlus); if (expand)
{
if (plus_div)
plus_div.src = "images/minus.gif"; for (i=0; i < c1_a.length; i++)
{
theRow = document.getElementById(c1_a[i]); theRow.style.display = '';
plus_div = document.getElementById(c1_a[i]+"_plus_image");
if (plus_div)
plus_div.src = "images/plus.gif";
}
} else {
if (plus_div)
plus_div.src = "images/plus.gif"; for (i=1; i < ca_a.length; i++)
{
theRow = document.getElementById(ca_a[i]) theRow.style.display = 'none';
}
}
}
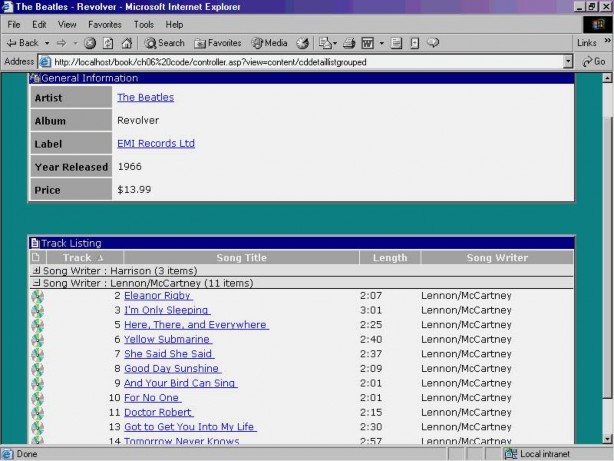
Để nhóm lại CDs cho thấy rằng trên trang chúng ta, XML phải được sửa đổi để đại diện cho sự phân cấp nhóm. Một trích đoạn từ tài liệu này được đưa vào danh sách sau đây.
<list.group>
<list.group.name>WRITER</list.group.name>
<list.group.description>Song Writer</list.group.description>
<list.group.value>Harrison</list.group.value>
<list.children>
<list.item>
<list.property>
<list.property.name>TRACK</list.property.name>
<list.property.value>1</list.property.value>
</list.property>
<list.property>
<list.property.name>TITLE</list.property.name>
<list.property.value>Taxman</list.property.value>
<list.property.href>controller.asp?view= trackdetail&id=10001</list.property.href>
</list.property>
<list.property>
<list.property.name>LENGTH</list.property.name>
<list.property.value>3:01</list.property.value>
</list.property>
<list.property>
<list.property.name>WRITER</list.property.name>
<list.property.value>Harrison</list.property.value>
</list.property>
</list.item>
<list.item>
<list.property>
<list.property.name>TRACK</list.property.name>
<list.property.value>4</list.property.value>
</list.property>
<list.property>
<list.property.name>TITLE</list.property.name>
<list.property.value>Love You To</list.property.value>
<list.property.href>controller.asp?view= trackdetail&id=10004</list.property.href>
</list.property>
<list.property>
<list.property.name>LENGTH</list.property.name>
<list.property.value>3:01</list.property.value>
</list.property>
<list.property>
<list.property.name>WRITER</list.property.name>
<list.property.value>Harrison</list.property.value>
</list.property>
</list.item>
<list.item>
<list.property>
<list.property.name>TRACK</list.property.name>
<list.property.value>12</list.property.value>
</list.property>
<list.property>
<list.property.name>TITLE</list.property.name>
<list.property.value>I Want to Tell You</list.property.value>
<list.property.href>controller.asp?view= trackdetail&id=10012</list.property.href>
</list.property>
<list.property>
<list.property.name>LENGTH</list.property.name>
<list.property.value>2:29</list.property.value>
</list.property>
<list.property>
<list.property.name>WRITER</list.property.name>
<list.property.value>Harrison</list.property.value>
</list.property>
</list.item>
</list.children>
</list.group>
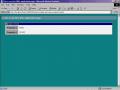
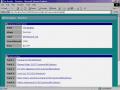
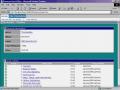
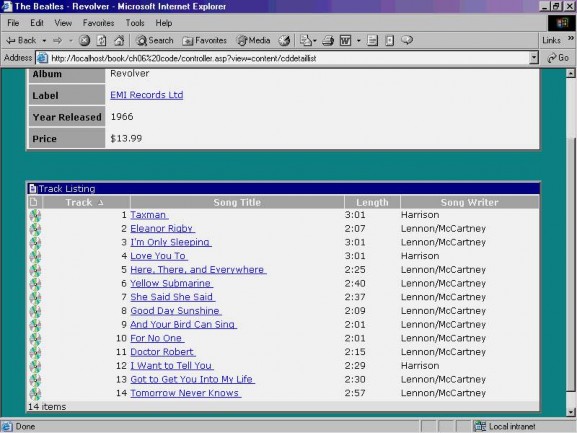
Bạn có thể nói bởi màn ảnh sau đây được chụp, một cách tiếp cận trên nền danh sách những công việc tốt nhất cho nhiều mục chọn vạch tuyến mà chia sẻ những thuộc tính tương tự. Những danh sách được có thể cũng đang là chấp thuận trong ứng dụng của chúng ta để hỗ trợ sự chọn do người dùng định ra, nhóm lại, cách lọc, và xuất khẩu. Hình sau cho thấy kết quả:
Sự dẫn hướng
Tất cả những ứng dụng, liệu nó là những ứng dụng doanh nghiệp lớn hay những chương trình những thiết bị cầm tay, có một thách thức dẫn hướng. Có nhiều câu hỏi để xem xét khi thiết kế một hệ thống dẫn hướng. Dẫn hướng dựa trên chức năng hay dẫn hướng dựa trên dữ liệu? Thực đơn? Thực đơn và cây? Thanh công cụ? Nút? Câu trả lời tới những câu hỏi này ," Nó phụ thuộc." Sự dẫn hướng là công cụ ứng dụng qui định và cách tổ chức nó phụ thuộc vào những nhân tố như mục đích ứng dụng, bề ngang và cơ sở người sử dụng.
Dù những sự thi hành có thể thay đổi, đa số những hệ thống dẫn hướng có những đặc trưng trừu tượng tương tự. Tất cả các hệ thống dẫn hướng đều là những tập hợp đơn thuần có tổ chức của những mối liên kết. Nó có thể đã chứa đựng những mối liên kết để hình thành hay những mối liên kết tới những trang Web. Chúng có thể đã có tổ chức bởi kiểu của chức năng nó thực hiện hay nởi kiểu của dữ liệu trên đó . Bởi vậy, trong khi XML không có khả năng để nói bạn để giải thách thức dẫn hướng của chương trình, sử dụng nó với mô hình như thế nào sơ đồ dẫn hướng của ứng dụng có thể cung cấp một vài khóa.
XML giúp đỡ bạn nghĩ về sự dẫn hướng trong những thuật ngữ trừu tượng hơn. Điều này giải phóng tâm trí của chúng ta bên ngoài cái hộp.
Nó đẩy mạnh tính mô đun trong ứng dụng của chúng ta. Lôgic doanh nghiệp mà xây dựng tài liệu dẫn hướng không nên được làm bừa bộn với những mệnh đề tương tự if browserType= ' Netscape' then . . .
Nó làm UI (của) các bạn dễ mở rộng hơn. Những sơ đồ UI dẫn hướng mới hơn có thể được nút vào trong cấu trúc dẫn hướng hiện hữu mà không có sự cải biến tới lôgic doanh nghiệp của chúng ta.
Cách tốt nhất để bắt đầu nghĩ về XML có thể giúp đỡ như thế nào bằng việc nhìn tại một mô hình dẫn hướng mẫu. Trong mục này chúng tôi sẽ khảo sát tới mô hình một hệ thống dẫn hướng sử dụng XML như thế nào. Chúng tôi sẽ rồi thử thay đổi mô hình dẫn hướng của chúng ta vào trong một khuôn dạng thích hợp để trả lại trên một trình duyệt Web.
Thử nghĩ bên ngoài cái hộp khi hợp nhất XML vào trong ứng dụng của chúng ta. Tại sao không phải thay đổi một cây dẫn hướng XML vào trong một UI được kích hoạt giọng nói?
Một giản đồ dẫn hướng đơn giản
Một cái cây là một thành phần dẫn hướng chung. Tim mô hình dẫn hướng chung hơn phần tử <navitem>. Từng phần tử <navitem> là một mối liên kết tới một tài liệu trong một ứng dụng trên nền web. Một <navitem> chứa đựng một sự mô tả, một hoặc nhiều biểu tượng, một sự tham chiếu đến siêu liên kết, và một tập hợp đệ quy của các con navitems . Mô hình này đơn giản tuy thế linh hoạt và đưa ra một sự đa dạng vô hạn (của) những cách để mô hình một hệ thống dẫn hướng.
<ElementType name="navitem.description" content="textOnly" model="closed"/>
<ElementType name="navitem.openIcon" content="textOnly" model="closed"/>
<ElementType name="navitem.closedIcon" content="textOnly" model="closed"/>
<ElementType name="navitem.icon" content="textOnly" model="closed"/>
<ElementType name="href" order="many" content="textOnly" model="closed"/>
<ElementType name="navitem.children" order="many" content="eltOnly" model="closed">
<element type="navitem" minOccurs="0" maxOccurs="*"/>
</ElementType>
<ElementType name="navitem" order="many" content="eltOnly" model="closed">
<element type="navitem.description" minOccurs="1" maxOccurs="1"/>
<element type="navitem.icon" minOccurs="0" maxOccurs="1"/>
<element type="navitem.openIcon" minOccurs="0" maxOccurs="1"/>
<element type="navitem.closedIcon" minOccurs="0" maxOccurs="1"/>
<element type="href" minOccurs="0" maxOccurs="0"/>
<element type="navitem.children" minOccurs="0" maxOccurs="1"/>
</ElementType>
Phần tử <navigation> là một một <navitem> đặc biết trong điều đó nó neo sự phân cấp dẫn hướng.
<ElementType name="navigation" order="many" content="eltOnly" model="closed">
<AttributeType name="type" />
<element type="navigation.description" minOccurs="1" maxOccurs="1"/>
<element type="navigation.icon" minOccurs="0" maxOccurs="1"/>
<element type="navigation.openIcon" minOccurs="0" maxOccurs="1"/>
<element type="navigation.closedIcon" minOccurs="1" maxOccurs="1"/>
<element type="href" minOccurs="0" maxOccurs="1"/>
<element type="navitem.children" minOccurs="0" maxOccurs="1"/>
</ElementType>
Một ví dụ dẫn hướng
Bây giờ, chúng ta hãy đặt mô hình từ mục trước đây đến sự sử dụng cho Noverant. Tài liệu XML dẫn hướng sau đây là phần nhỏ của Noverant. Ví dụ bao gồm những mục để gìn giữ CD, Nghệ sĩ, và những cơ sở dữ liệu kiểm kê.
<navigation>
<description>Noverant Back-Office Root Menu</description>
<children>
<navitem>
<description>Artists</description>
<icon>artist.gif</icon>
<children>
<navitem>
<description>Search for an Artist</description>
<href>controller.asp?view=artistSearch</href>
<icon>artist.gif</icon>
</navitem>
<navitem>
<description>New Artist</description>
<href>controller.asp?view=artistAdd</href>
<icon>newArtist.gif</icon>
</navitem>
</children>