Những quy tắc này có thể được sửa đổi dễ dàng bằng việc chỉnh XSLT. Giả thiết rằng Noverant muốn giữ gìn bất động sản trên những trang Web của nó bằng việc chấp nhận một cách tiếp cận " ngăn thư mục " để làm bằng lòng cách trình bày (thay vì việc đưa lên những nội dung trên một nội dung khác. Điều này có thể được đạt được bằng việc điều chỉnh mẫu section trong XSLT của chúng ta.
Những chuyên gia bố cục có thể bắt đầu thử nghiệm kỹ thuật hiển thị khác nhau một khi giản đồ XML của chúng ta đã được định nghĩa. Chi phí nhỏ liên quan đến làm kiểu dáng toàn cầu thay đổi, như những quy tắc này được địa phương hóa trong tài liệu XSLT của chúng ta.
Một danh sách mã của phiên bản mới của sự chuyển đổi sau đây. JavaScript được thêm vào đỉnh của trang để xử lý chuyển đổi ngăn. Mẫu section đã được làm tăng che giấu tất cả các khu vực trừ khu vực đầu tiên để hiển thị một dòng những nút nhấn để kích hoạt các mục nội dung khác. Hai lớp mới,tabButton và activeTabButton được bổ sung vào CSS để kiểm soát sự định dạng của các ngăn nút nhấn.
<xsl:stylesheet xmlns:xsl="http://www.w3.org/1999/XSL/Transform" version="1.0">
<xsl:output method="html" indent="yes" />
<xsl:template match="document">
<html>
<head>
Có thể bạn quan tâm!
-
 Lập trình web nâng cao XML - Trường CĐN Đà Lạt - 8
 -
 Xây Dựng Giao Diện Người Sử Dụng Dựa Vào Xml.
 -
 Lập trình web nâng cao XML - Trường CĐN Đà Lạt - 10
 -
 Lập trình web nâng cao XML - Trường CĐN Đà Lạt - 12
 -
 Lập trình web nâng cao XML - Trường CĐN Đà Lạt - 13
 -
 Lập trình web nâng cao XML - Trường CĐN Đà Lạt - 14
Xem toàn bộ 258 trang tài liệu này.
<link rel="stylesheet" type="text/css" href="css/style.css"/>
<xsl:if test="header/title"><title><xsl:value-of select="header/title"/></title></xsl:if>
Sự cài đặt kịch bản cho hành động “ngăn” (tab) trên màn hình sau đây . Chức năng chấp nhận ID của một ngăn, mang tới mặt trước ngăn bằng việc đặt thuộc hiển thị của nó. Chức năng rồi lặp lại qua những ngăn khác, làm cho không nhìn thấy ngăn bằng việc đặt thuộc tính kiểu của nó thành none.
<script language="javaScript">
<![CDATA[
function showTab(section, scnt) { for (i=0; i < scnt; i++) {
t = document.getElementById("s_"+i); if (t) {
if (i == section) { t.style.display = '';
} else {
t.style.display = 'none';
}
}
}
}
]]>
</script>
</head>
<body>
<div class="document">
<xsl:apply-templates/>
</div>
</body>
</html>
</xsl:template>
<xsl:template match="document/header">
<div class="documentHeader">
<xsl:if test="icon">
<img align="absmiddle" src="images/{icon}"/>
</xsl:if>
<xsl:value-of select="title"/>
</div>
</xsl:template>
Mẫu biến đổi section chứa đựng khối lớn những sự thay đổi cần thiết để cài đặt các ngăn. Mẫu phải bây giờ theo dõi những phần tử anh chị em <section> để hiển thị những ngăn tại đỉnh. Lôgic trong mẫu này tạo ra các ngăn tối và chỉ sáng một ngăn ngữ cảnh. Toàn bộ những ngăn những anh chị em ruột, hay những nút, chứa một sự kiện onClick () gọi hàm Javascript showTab() mang một phần nội dung tới mặt trước.
<xsl:template match="section">
<xsl:variable name="numsections" select="count(../section)"/>
<xsl:variable name="precedingsibs" select="count(preceding-sibling::section)"/>
<xsl:variable name="sectionid" select="concat('s_',$precedingsibs)"/>
<div align="center">
<xsl:if test="$precedingsibs = 0">
<xsl:attribute name="style">padding-top:20px</xsl:attribute>
</xsl:if>
<div id="{$sectionid}" align="center" class="section">
<xsl:if test="$precedingsibs > 0">
<xsl:attribute name="style">display:none</xsl:attribute>
</xsl:if>
<xsl:apply-templates select="header"/>
<xsl:if test="$numsections > 1">
<div align="left">
XSLT này tạo ra những ngăn nút tất cả các phần trước đây trong tài liệu.
<xsl:for-each select="preceding-sibling::section">
<xsl:choose>
<xsl:when test="header/shortTitle">
<button id="button{position}" class="tabButton" onClick="showTab({position()-
1},
{$numsections})"><xsl:value-of select="header/shortTitle"/></button>
</xsl:when>
<xsl:otherwise>
<button id="button{position}" class="tabButton" onClick="showTab({position()-1},{$numsections})"><xsl:value-of select="header/title"/></button>
</xsl:otherwise>
</xsl:choose>
</xsl:for-each>
Bây giờ XSLT tạo các ngăn cho nút section hiện tại . Chú ý rằng lớp CSS gán cho nút được có thay đổi thành activeTabButton để chỉ ra một ngăn được chọn.
<xsl:choose>
<xsl:when test="header/shortTitle">
<button id="button{position}" class="activeTabButton" onClick="showTab({$precedingsibs},{$numsections})">
<xsl:value-of select="header/shortTitle"/></button>
</xsl:when>
<xsl:otherwise>
<button id="button{position}" class="activeTabButton" onClick="showTab({$precedingsibs},{$numsections})">
<xsl:value-of select="header/title"/></button>
</xsl:otherwise>
</xsl:choose>
Mẫu XSLT lặp lại qua tất cả sự theo sau phần tử <section>. Những ngăn này cũng được ghi dấu như không kích hoạt.
<xsl:for-each select="following-sibling::section">
<xsl:choose>
<xsl:when test="header/shortTitle">
<button id="button{position}" class="tabButton" onClick="showTab({$precedingsibs+position()},{$numsections})">
<xsl:value-of select="header/shortTitle"/></button>
</xsl:when>
<xsl:otherwise>
<button id="button{position}" class="tabButton" onClick="showTab({$precedingsibs+position()},{$numsections})">
<xsl:value-of select="header/title"/></button>
</xsl:otherwise>
</xsl:choose>
</xsl:for-each>
</div>
</xsl:if>
<xsl:apply-templates select="view"/>
</div>
</div>
</xsl:template>
Phần còn lại của mẫu vẫn không thay đổi:
<xsl:template match="section/header">
<div class="sectionHeader">
<xsl:if test="icon">
<img align="absmiddle" src="images/{icon}"/>
</xsl:if>
<xsl:value-of select="title"/>
</div>
</xsl:template>
<xsl:template match="view">
<xsl:apply-templates/>
</xsl:template>
<xsl:template match="properties">
<table cellpadding="5">
<xsl:apply-templates/>
</table>
</xsl:template>
<xsl:template match="property">
<tr>
<td bgcolor="a1a1a1">
<font class="text"><b><xsl:value-of select="@description"/>
</b></font>
</td>
<td><font class="text">
<xsl:choose>
<xsl:when test="@href"><a href="{@href}">
<xsl:apply-templates /></a></xsl:when>
<xsl:otherwise><xsl:apply-templates /></xsl:otherwise>
</xsl:choose>
</font></td>
</tr>
</xsl:template>
</xsl:stylesheet>
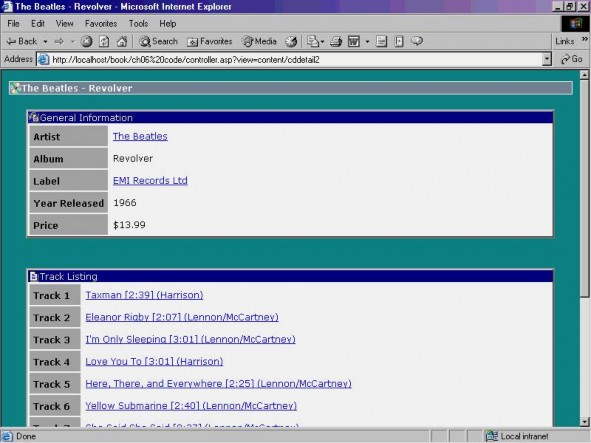
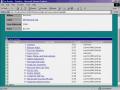
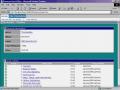
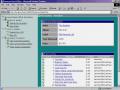
The những hiệu ứng của việc áp dụng sự chuyển đổi mới vào cùng tài liệu XML nguồn có thể được nhìn thấy trong hình sau:
Khung nhìn danh sách
Tại điểm này chúng ta nhìn thấy làm sao bạn có thể sử dụng XML và XSLT để tạo ra chung bằng những khối của những danh sách thuộc tính. Đây là một cách tiếp cận quen thuộc trình bày thông tin liên quan tới một người sử dụng. Đôi khi, tuy nhiên, những cơ cấu cách trình bày khác thích hợp hơn. Chẳng hạn, mục CD Track Listing có lẽ đã được đưa vào một Danh sách tốt hơn hơn nơi mỗi hàng đại diện cho một Track với những cột riêng biệt cho số track, tiêu đề, chiều dài, và tác giả. Để hoàn thành điều này chúng tôi cần mở rộng mô hình XML chúng ta hỗ trợ một cơ cấu danh sách đơn giản.
The mức đỉnh (của) một tài liệu XML danh sách sẽ chứa đựng một sự mô tả và một sự tham khảo tới một biểu tượng mặc định sẽ được trình bày trên mỗi hàng. Biểu tượng này có thể bị đè bởi một sự tham chiếu tới một biểu tượng chuyên biệt về hàng.
<ElementType name="icon" content="textOnly" model="closed"/>
<ElementType name="list.description" content="textOnly" model="closed"/>
Danh sách cũng cần một tập hợp những cột được định nghĩa những kiểu khác nhau của những trường mà mỗi hàng sẽ chứa. Tất cả các cột sẽ có một tên, sự mô tả, và kiểu dữ liệu. Một cột sắp xếp sẽ chỉ báo dữ liệu có được phân loại theo thứ tự tăng dần hay giảm dần.
<ElementType name="list.column.sortdirection" content="textOnly" model="closed"/>
<ElementType name="list.column.name" content="textOnly" model="closed"/>
<ElementType name="list.column.description" content="textOnly" model="closed"/>
<ElementType name="list.column.datatype" content="textOnly" model="closed"/>
<ElementType name="list.column" order="many" content="eltOnly" model="closed">
<element type="list.column.sortdirection" minOccurs="0" maxOccurs="1"/>
<element type="list.column.name" minOccurs="1" maxOccurs="1"/>
<element type="list.column.description" minOccurs="1" maxOccurs="1"/>
<element type="list.column.datatype" minOccurs="1" maxOccurs="1"/>
</ElementType>
Một danh sách của các phần tử column sẽ đưa vào trong một phần tử cha columns.
<ElementType name="list.columns" order="many" content="eltOnly" model="closed">
<element type="list.column" minOccurs="0" maxOccurs="*"/>
</ElementType>
Tất cả các dòng trong danh sách sẽ có một tập hợp các thuộc tính ấn định dữ liệu sẽ hiển thị trong dòng. Phần tử list.property chứa một phần tử list.propterty.name khớp với giá trị của phần tử list.column.name và một phần tử hyperlink tùy chọn.
<ElementType name="list.property.name" content="textOnly" model="closed"/>
<ElementType name="list.property.value" content="textOnly" model="closed"/>
<ElementType name="list.property.href" content="textOnly" model="closed"/>
<ElementType name="list.property" order="many" content="eltOnly" model="closed">
<element type="list.property.name" minOccurs="1" maxOccurs="1"/>
<element type="list.property.value" minOccurs="1" maxOccurs="1"/>
<element type="list.property.href" minOccurs="0" maxOccurs="1"/>
</ElementType>
Danh sách sẽ đầy đủ nếu không có sự hỗ trợ nhóm bởi một giá trị cột chung. Việc tổng kết thông tin cách này có thể là một phương tiện có hiệu quả của việc tổ chức dữ liệu. Điều này sẽ được hoàn thành trong giản đồ của chúng ta bằng việc chèn những phần tử list.group chỉ báo cột được nhóm lại, giá trị chung cùng nhóm, và một danh sách các con sẽ chia sẻ giá trị đó.
<ElementType name="list.group.name" content="textOnly" model="closed"/>
<ElementType name="list.group.description" content="textOnly" model="closed"/>
<ElementType name="list.group.value" content="textOnly" model="closed"/>
<ElementType name="list.children" order="many" content="eltOnly" model="closed">
<element type="list.item" minOccurs="0" maxOccurs="*"/>
<element type="list.group" minOccurs="0" maxOccurs="*"/>
</ElementType>
<ElementType name="list.item" order="many" content="eltOnly" model="closed">
<element type="list.property" minOccurs="0" maxOccurs="*"/>
<element type="icon" minOccurs="0" maxOccurs="1"/>
</ElementType>
<ElementType name="list.group" order="many" content="eltOnly" model="closed">
<element type="list.group.name" minOccurs="1" maxOccurs="1"/>
<element type="list.group.description" minOccurs="1" maxOccurs="1"/>
<element type="list.group.value" minOccurs="1" maxOccurs="1"/>
<element type="list.children" minOccurs="1" maxOccurs="1"/>
</ElementType>
Cuối cùng, phần tử list sẽ được đưa vào một nút đơn.
<ElementType name="list" order="many" content="eltOnly" model="closed">
<element type="icon" minOccurs="1" maxOccurs="1"/>
<element type="list.description" minOccurs="1" maxOccurs="1"/>
<element type="list.columns" minOccurs="1" maxOccurs="1"/>
<element type="list.children" minOccurs="0" maxOccurs="1"/>
</ElementType>
Để tránh những đặc tính như<,>, và & trong dữ liệu XML của chúng ta. Những đặc tính này có thể bò vào trong những trang XML của chúng ta, đặc biệt khi nội dung của chúng ta được khôi phục động từ một cơ sở dữ liệu, và nguyên nhân phát sinh lỗi thực thi XSLT.
Bây giờ chúng tôi thay thế danh sách track trên nền thuộc tính dịu dàng với việc sử dụng giản đồ danh sách mới của chúng ta. Tài liệu XML này lớn hơn so với phiên bản nhìn thấy trước đây. Việc phát sinh mã đằng sau những danh sách như vậy có thể là trở nên chán và dễ xảy ra lỗi khi chúng ta làm bằng tay. Thật khôn ngoan để đầu tư thời gian trong việc tạo ra những kịch bản phía máy chủ để giúp đỡ tự động hóa quá trình.
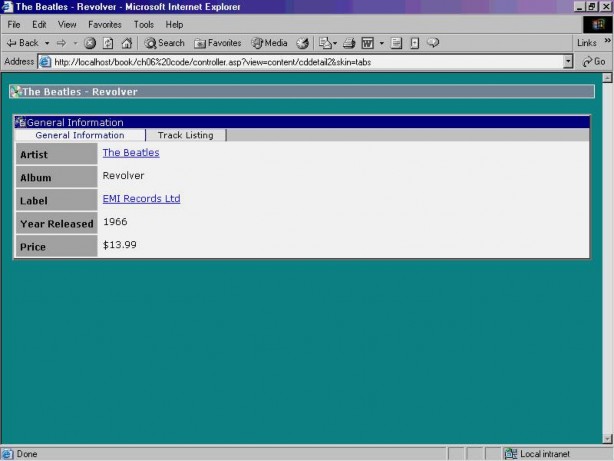
<document>
<header>
<title>The Beatles - Revolver</title>
<icon>CD.gif</icon>
</header>
Mục đầu tiên của tài liệu này ở cũng như trước đây.
<section>
<header>
<title>General Information</title>
<icon>world.gif</icon>
</header>
<view>
<properties>
<property href="controller.asp?view=artistdetail&id=10001" description="Artist">The Beatles</property>
<property description="Album">Revolver</property>
<property href="controller.asp?view=labeldetail&id=10001" description="Label">EMI Records Ltd</property>
<property description="Year Released">1966</property>
<property description="Price">$13.99</property>
</properties>
</view>
</section>
Mục thứ hai được thay thế bởi một cơ cấu danh sách XML. Sự nhìn danh sách bắt đầu với thông tin mô tả những cột sẽ xuất hiện trong bảng.
<section>
<header>
<title>Track Listing</title>
<icon>document.gif</icon>
</header>
<view>
<list>
<icon>CD.gif</icon>
<list.description>The Beatles / Revolver: Track Listing
</list.description>
<list.columns>
<list.column>
<list.column.sortdirection>asc</list.column.sortdirection>
<list.column.name>TRACK</list.column.name>
<list.column.description>Track</list.column.description>
<list.column.datatype>numeric</list.column.datatype>
</list.column>
<list.column>
<list.column.name>TITLE</list.column.name>
<list.column.description>Song Title</list.column.description>
<list.column.datatype>text</list.column.datatype>
</list.column>
<list.column>
<list.column.name>LENGTH</list.column.name>
<list.column.description>Length</list.column.description>
<list.column.datatype>text</list.column.datatype>
</list.column>
<list.column>
<list.column.name>WRITER</list.column.name>
<list.column.description>Song Writer</list.column.description>
<list.column.datatype>text</list.column.datatype>
</list.column>
</list.columns>
Chúng ta tạo nên phần tử <listitem> cho mỗi bài hát trên album. Mỗi listitem, hay hàng trong bảng, chứa đựng những thuộc tính cho mỗi cột được định nghĩa trong bảng. Sự điều chỉnh những thuộc tính bên trong<listitem> không quan trọng; columns là phần tử gốc điều khiển tại liệu theo thứ tự cột.
<list.children>
<list.item>
<list.property>
<list.property.name>TRACK</list.property.name>
<list.property.value>1</list.property.value>
</list.property>
<list.property>
<list.property.name>TITLE</list.property.name>
<list.property.value>Taxman</list.property.value>
<list.property.href>controller.asp?view= trackdetail&id=10001</list.property.href>
</list.property>
<list.property>
<list.property.name>LENGTH</list.property.name>
<list.property.value>3:01</list.property.value>
</list.property>
<list.property>
<list.property.name>WRITER</list.property.name>
<list.property.value>Harrison</list.property.value>
</list.property>
</list.item>
<list.item>
<list.property>
<list.property.name>TRACK</list.property.name>
<list.property.value>2</list.property.value>
</list.property>
<list.property>
<list.property.name>TITLE</list.property.name>
<list.property.value>Eleanor Rigby</list.property.value>
<list.property.href>controller.asp?view= trackdetail&id=10002</list.property.href>
</list.property>
<list.property>
<list.property.name>LENGTH</list.property.name>
<list.property.value>2:07</list.property.value>
</list.property>
<list.property>
<list.property.name>WRITER</list.property.name>
<list.property.value>Lennon/McCartney
</list.property.value>
</list.property>
</list.item>
<list.item>
<list.property>
<list.property.name>TRACK</list.property.name>
<list.property.value>3</list.property.value>
</list.property>
<list.property>
<list.property.name>TITLE</list.property.name>
<list.property.value>I'm Only Sleeping
</list.property.value>
<list.property.href>controller.asp?view= trackdetail&id=10003</list.property.href>
</list.property>
<list.property>
<list.property.name>LENGTH</list.property.name>
<list.property.value>3:01</list.property.value>
</list.property>
<list.property>
<list.property.name>WRITER</list.property.name>
<list.property.value>Lennon/McCartney
</list.property.value>
</list.property>
</list.item>
<list.item>
<list.property>
<list.property.name>TRACK</list.property.name>
<list.property.value>4</list.property.value>
</list.property>
<list.property>
<list.property.name>TITLE</list.property.name>
<list.property.value>Love You To</list.property.value>
<list.property.href>controller.asp?view= trackdetail&id=10004</list.property.href>
</list.property>
<list.property>
<list.property.name>LENGTH</list.property.name>
<list.property.value>3:01</list.property.value>
</list.property>
<list.property>
<list.property.name>WRITER</list.property.name>
<list.property.value>Harrison</list.property.value>
</list.property>
</list.item>
</list.children>
</list>
</view>
</section>
</document>
Cuối cùng, chúng ta cần mở rộng XSLT của chúng ta hiểu nó phải làm gì với các phần tử định nghĩa trong giản đồ danh sách của chúng ta. Mẫu đầu tiên sẽ phù hợp với phần tử list. Mục đích của nó sẽ sẽ khởi tạo một bảng HTML để chứa đựng danh sách.
<xsl:template match="list">
<table class="list" cellspacing="0" cellpadding="0">