II. Transplanting method using machine
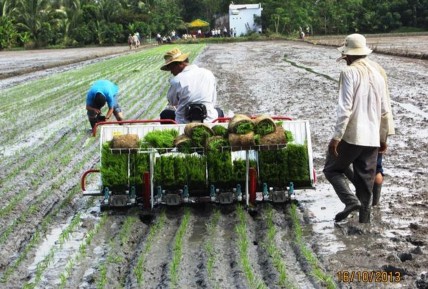
Figure 2. Paddy plants transplanted by transplanting machine
(Photo: http://www.hamco.vn/ban-tin-hamco)
The use of machine for transplanting brings control to the space between the plants and the number of seedlings in the processes. The usual cultivation practice in Malaysia is a distance of 14 to 20 cm between the heels and 30 cm between each row. There are usually 3 to 5 bars of seedlings for a clump, and usually the seedlings are between 14 and 20 days old.
III. Advantages of planting using the transplanter
The use of a transplanter helps to reduce the possibility of weedy paddy through careful selection of the seeds prior to transplanting. Weedy paddy already present in the field can also be removed early before these weedy paddy reach maturity. Cost efficiency is maximized due to the reduced use of seeds and careful spacing between the paddy plants. There is reduced competition between paddy plants with regards to space, light, and nutrients. Farmers may then concentrate their efforts on the care of the plants such as the use of fertilizers and control of pests and diseases in the daily management of their paddy plantations.
Có thể bạn quan tâm!
-

 Giáo trình Anh văn chuyên ngành Nghề Khoa học cây trồng - Cao đẳng - Trường Cao đẳng Cộng đồng Đồng Tháp - 5
 -
 Giáo trình Anh văn chuyên ngành Nghề Khoa học cây trồng - Cao đẳng - Trường Cao đẳng Cộng đồng Đồng Tháp - 6
 -
 Transplanting Method Helping Increase Paddy Yields
 -
 Giáo trình Anh văn chuyên ngành Nghề Khoa học cây trồng - Cao đẳng - Trường Cao đẳng Cộng đồng Đồng Tháp - 9
 -
 Giáo trình Anh văn chuyên ngành Nghề Khoa học cây trồng - Cao đẳng - Trường Cao đẳng Cộng đồng Đồng Tháp - 10
 -
 Giáo trình Anh văn chuyên ngành Nghề Khoa học cây trồng - Cao đẳng - Trường Cao đẳng Cộng đồng Đồng Tháp - 11
Xem toàn bộ 91 trang tài liệu này.
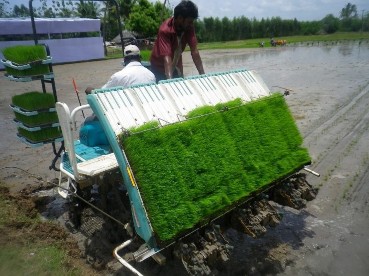
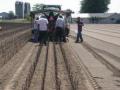
Figure 3. Working with the transplanting machine
(Photo: Internet source)
IV. Caring paddy plants after transplanting
A. Reasons of weeds removed
Weeds take mineral salts out of the soil, so the rice cannot use them and will be undernourished. Not only do weeds get in the way of harvesting, weeds but also prevent the rice from growing and tillering well.
What does tillering mean?
The rice tillers are several stems which develop on the same plant. The buds at the bottom of the stem develop and make new stems.
After tillering, each grain sown will have several stems, and every stem makes a panicle (or head) of rice. But weeds prevent tillering.
B. When to weed
If the field is flooded before transplanting, no weeds will have grown. But when the paddy plants are transplanted, the water is drained away, and then the weeds can grow.
- Weed 2 weeks after transplanting. Pull the weeds out by hand.
- Later more weeds will have grown. They must be weeded again.
- Every time when weeds have grown, they must be pulled out.
This means a lot of work, but costs no money. Rice grows much better in a field without weeds, and it will bring a much bigger yield.
C. Flooding and draining
1. Flooding
- If it is necessary for water to be in any particular check, block up the main irrigation channel with earth. The water then flows into the distribution channel.
- Make a hole in the levee of the check which needed to be flooded, then block up the distribution channel with earth. The water will flood the check.
- When there is a good depth of water in the check, close the hole in the levee, open the distribution channel and flood the next check.
2. Draining
When the water needs to be flowed out of a check, make a hole in the levee that divides the check from the feeder drain, or push a pipe through the levee, for example a bamboo, to connect the check with the drain .
3. When to flood and drain
- In order to produce a higher yield, the rice must constantly stand in water.
But it is wrong to flood the field always to the same depth of water.
- For the first 6 to 8 days after transplanting, leave the soil a liquid mud. If the soil becomes dry, let in only a little water.
- About a week after transplanting, when the rice has begun to grow, flood the field with 2 to 3 centimetres of water and leave for 45 days. However, twice during these 45 days, drain the field in order to apply fertilizers. Each time, drain for 2 days.
- After 45 days, that is, 2 months after transplanting, increase the depth of water to 10 centimetres.
- When the panicles have formed and are turning yellow, the rice field must always be well flooded. It should have about 20 centimetres of water. Afterwards gradually make the water less deep. 10 days before harvesting, drain all the water away.
4. Applying fertilizers
2 weeks after transplanting, pull out the weeds. Drain all the water away. Apply 100 kilogrammes of ammonium sulfate for every hectare of rice field. This fertilizer contains nitrogen. When the panicles are forming, drain and apply 50 kilogrammes of ammonium sulfate for every hectare.
http://www.sittheng.com.my/en/transplant-method.html
Better Farming Series 21. Wet Paddy or Swamp Rice (FAO, 1977, 40 p.)
Further reading 2
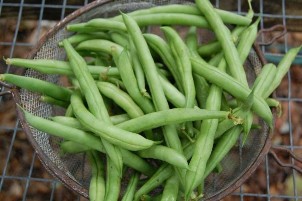
BEAN
Latin Name: Phaseolus vulgaris
Scientific name: Phaseolus vulgaris. Family: Fabaceae Common Name: Green Bean, Snap Bean, String Bean
I. Overview
Often called green beans or string beans, the common garden bean can be both stringless and colors other than green. But it’s the green bean that everyone recognizes as one of the most frequently prepared vegetables. Hot, cold, even raw, string beans are versatile in the kitchen and very prolific growing plants in the garden.
II. Description
Figure 1. String Bean
(Photo: Internet source)
Green bean plants are either pole varieties or bush. Most varieties are green, but you’ll also find purple, red, yellow and streaked varieties. Green beans are several inches long and either round or flattened in shape. They are picked young and tender, before the seeds inside have fully developed. Most popular varieties have been bred to have stringless pods, but many gardeners prefer the flavor of the old-fashioned ‘string’ types.
III. How a bean plant grow
A. Germination
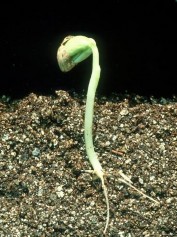
- When you plant a bean in soil and water it, the bean will germinate in about a week. At this point it is critical that the environment is suitable for the bean, which means that there is adequate oxygen, water, warmth and even darkness--- conditions common in the spring.
- The seed remains underground and collects nutrients before the primary root appears, which anchors the seed and further feeds the embryo water and minerals from the soil.
- The shoot of the plant, called the hypocotyl, then emerges and shoots up, pulling the cotyledons with it above ground. Leaves then appear, and the hypocotyl
will grow until it looks like a bent hairpin. Figure 2. Bean hypocotyl
(Photo: Internet source)
B. Growth
When the hypocotyl pokes through the earth and receives sunlight, phototropism begins. Phototropism is the movement or growth of an organism---in this case, a plant shoot---toward a source of light without the complete movement of the entire organism. This approximately six-week process causes the hypocotyl to straighten out.
Further reading 3
TOMATO
Scientific name: Lycopersicon esculentum. Family: Solanaceae
I. When to pick
- Fruit that is fully ripened on the vine has a much fuller flavor than fruits that are picked early and then allowed to ripen.
- Many cherry tomatoes, however, have a tendency to crack if they stay on the plant, so they should be picked at the peak of redness, or even a tad before.
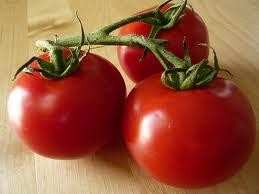
Figure 1. Ripe tomato
(Photo: Internet source)
- When daytime fall temperatures are consistently below 60 degrees Fahrenheit, fruit will no longer ripen on the vine, so it is time to bring all mature green fruits indoors, either on the vine or off.
II. How to store ripe fruit
- Wash and dry your tomatoes before storing.
- Unless you're planning to store your tomatoes for over a week, a windowsill, counter-top or bowl works fine.
- If you know you won't use them in the next few days, then lower temperatures (a cool entryway, the refrigerator) will help preserve the fruit. However, the cooler temperatures can reduce flavor and cause mushiness.
*Other storage for ripe fruit: If you end up with too many tomatoes to eat at one time, try these storage methods:
• canning, which will preserve your tomatoes for a year or more;
• freezing, which can be used for up to eight months;
• drying, which can keep tomatoes for more than a year.
C. Other uses for ripe fruit
- Bake fruity breads, cakes and muffins.
- Freeze citrus fruit juice.
- Turn it into a smoothie, pureed sauce or jam.
- Turn it into nourishing facial masks or hair conditioners.
- Ripen other fruit.
III. Easy ways to ripen fruit
A. Paper bags

Figure 2. Tomato smoothie
(Photo: Internet source)
Many fruits — including avocados, bananas, pears, peaches, and tomatoes
— will ripen better when placed in a paper bag.

- To hasten the ripening process of any fruit, place an already ripe apple or banana peel in the same bag and store it at room temperature.
- To ripen green bananas, wrap them in a damp dishtowel before placing them in the bag. Once your fruits have adequately ripened, you can halt the process by putting them in the
refrigerator. Figure 3. Paper bag
(Photo: Internet source)
B. Plastic bags
Some of the fruit like peaches you just bought at the local farm stand are hard as rocks.
- Place the fruit with a few already ripe pieces or some ripe bananas in a plastic bag. The ripe fruit will help soften the others through the release of their natural gas.