[43] J.M. Pollard (1974), “Theorems of Factorization and Primality Testing”, Proceedings of the Cambridge Philosophical Society 76, pp. 521–528.
[44] J.M. Pollard (1975), “A Monte Carlo method for factorization”, BIT Numerical Mathematics, 15(3), pp. 331-334.
[45] C. Pomerance (1984), “The quadratic sieve factoring algorithm”, Lecture Notes in Computer Science, Advances in Cryptology, vol. 209, pp. 169-182.
[46] M.O. Rabin (1980), “Probabilistic Algorithm for Testing Primality”, Journal of Number Theory, 12(1), pp. 128– 138.
[47] V. Rijmen, E. Oswald (2005), “Updated on SHA-1, IAIK”, Graz University of Technology, Denmark.
[48] R.L. Rivest, A. Shamir, L.M. Adleman (1978), “A Method for Obtaining Digital Signatures and Public-Key Cryptosystems”, Communications of the ACM, 21(2), pp.120–126.
[49] R.L. Rivest, R.D. Silverman (1999), “Are „Strong‟ Primes Needed for RSA”.
[50] R.L. Rivest, A. Shamir, L.M. Adleman (1978), “A method for obtaining digital signatures and public-key cryptosystems”, Communications of the ACM, 21(2), pp. 120-126.
[51] Y. Seung, R. Kravets (2002), “Practical PKI for Ad Hoc Wireless Networks”, Departmnet of Computer Science, University of Illinois, Urbama-Champain Technical Report.
Có thể bạn quan tâm!
-

 So Sánh Các Đặc Điểm Của Ejbca Và Openca
 -
 Mô Hình Triển Khai Hệ Thống Chứng Thực Tại Khoa Cntt, Trường Đh Khtn, Tp.hcm
 -
 Nghiên cứu kiến trúc và xây dựng hệ thống chứng thực tập trung - 20
Xem toàn bộ 171 trang tài liệu này.
[52] A. Shamir (1979), “How to Share a Secret”, Communication of the ACM, 22(11).
[53] R.D. Silverman (1987), “The Multiple Polynomial Quadratic Sieve,” Mathematics of Computation, 48(177), pp. 329–339.
[54] G.J. Simmons, M.J. Norris (1977), “Preliminary comments on the MIT public-key cryptosystem”, Cryptologia, 1(4), pp. 406-414.
[55] R. Solovay and V. Strassen (1977), “A Fast Monte–Carlo Test for Primality”, SIAM Journal on Computing, vol.6, pp. 84–85.
[56] X. Wang, D. Feng, X. Lai, H. Yu (2004), “Collisions for Hash Functions MD4, MD5, HAVAL-128 and RIPEMD”, Cryptology ePrint Archive Report 2004/199.
[57] X. Wang, X. Lai, D. Feng, H. Chen, X. Yu (2005), “Cryptanalysis of the Hash Functions MD4 and RIPEMD”, Eurocrypt 2005, pp. 1–18.
[58] X. Wang, H. Yu, Y.L. Yin (2005), “Efficient Collision Search Attacks on SHA-0”,
CRYPTO 2005.
[59] X. Wang, Y.L. Yin, H. Yu (2005), “Finding Collisions in the Full SHA-1”, CRYPTO 2005.
[60] J. Weise (2001), “Public Key Infrastructre Overview”, SunPSSM Global Security Practice, Sun BluePrints™ OnLine.
[61] M. Wiener (1990), “Cryptanalysis of short RSA secret exponent”, IEEE Transactions of Information Theory, 36, pp. 553-558.
[62] H. C. Williams, B. Schmid (1979), “Some remarks concerning the MIT public-key cryptosystem”, BIT, vol. 19 pp.525-538.
[63] H.C. Williams (1982), “A p+1 method of factoring”, Math. Comp. 39, pp. 225-234.
[64] Federal Register (2007), Notices, 72 (212).
[65] Internet X.509 Public Key Infrastructure PKIX Roadmap, March 10, 2000.
[66] FIPS 180 (13/5/1993)/ FIPS 180-1 (1995)/ FIPS 180-2 (1/8/2002)/ FIPS 180-3 (draft,
8/6/2007), Announcing the Secure Hash Standard (SHS).
[67] FIPS 186 (19/5/1994)/ 186-1 (15/12/1998)/ 186-2 (27/12000)/ 186-3 (draft, 3/2006),
Announcing the Digital Signature Standard (DSS).
[68] NCCUSL (1999), Uniform Electronic Transactions Act.
[69] RFC 1321, The MD5 Message-Digest Algorithm.
[70] RCF 2251, The Lightweight Directory Access Protocol version 3.
Phụ lục A
Tên phân biệt theo chuẩn X.500
X.500 giới thiệu cách đặt tên riêng biệt (Distinguished Name – DN), bảo đảm rằng mỗi đối tượng sẽ có một tên khác nhau.
Các thành phần:
Quốc gia (Country – C)
Tỉnh/Thành phố (State or Province – SP)
Địa phương (Locality – L)
Tổ chức (Organization – O)
Bộ phận (Organizational Unit – OU)
Tên chung (Common Name – CN)
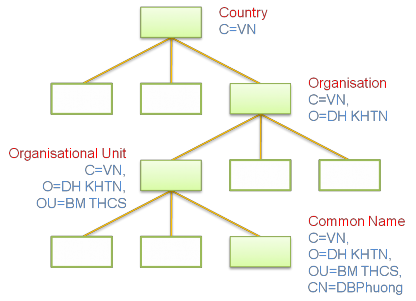
Hình 9.1. Ví dụ về tên phân biệt theo chuẩn X.500
Phụ lục B
Triển khai EJBCA trên môi trường Windows và Linux Các bước triển khai EJBCA trên môi trường Windows XP/2003/Vista, sử dụng hệ quản trị cơ sở dữ liệu MySQL như sau:
Bước 1: Tạo thư mục c:pki.
Tất cả mọi thứ sau này sẽ được cài đặt trong thư mục này.
Bước 2: Cài đặt Java
Tải phiên bản JDK về cài đặt, phiên bản mới nhất là jdk 1.6 update 6 tại địa chỉ: http://www.sun.com/
Gói tải về có tên: jdk-6u6-windows-i586-p.exe
Cài đặt vào thư mục c:pkijava
Tạo biến môi trường: JAVA_HOME = c:pkijavajdk1.6.0_06
Thêm vào biến môi trường Path: c:pkijavajdk1.6.0_06bin
Kiểm tra cài đặt thành công bằng cách mở cmd gõ lệnh: java –version
Bước 3: Thay thế JCE Policy
Tải Unlimited Strength Jurisdiction Policy Files for JDK tại địa chỉ: http://www.sun.com/
Giải nén và chép đè vào thư mục $JAVA_HOME jrelibsecurity và thư mục runtime của java jrelibsecurity.
Bước 4: Cài đặt Ant
Tải apache-ant-1.7.0-bin.zip tại địa chỉ: http://www.apache.com/
Giải nén vào thư mục C:PKI
Tạo biến môi trường: ANT_HOME = c:pkiapache-ant-1.7.0
Tạo biến môi trường: ANT_OPTS = -Xmx512m (điều chỉnh bộ nhớ tối đa để build ứng dụng)
Thêm vào biến môi trường Path: c:pkiapache-ant-1.7.0bin
Kiểm tra cài đặt thành công bằng cách mở cmd gõ lệnh: ant –version
Bước 5: Cài đặt JBoss
Tải jboss-4.2.2.GA.zip tại trang địa chỉ: http://sourceforge.net
Giải nén vào thư mục c:pki
Tạo biến môi trường: JBOSS_HOME = c:pkijboss-4.2.2.GA
Thêm vào biến môi trường Path: c:pkijboss-4.2.2.GAbin
Vào cmd gõ lệnh run.bat) để khởi động JBoss. Nhấn Ctrl+C để dừng JBoss.
Bước 6: Thiết lập JBoss chạy như một Windows Service (tùy chọn)
Tải Java Service Wrapper tại địa chỉ: http://sourceforge.net
Giải nén vào thư mục c:java-wrapper
Chép và đổi tên các tập tin sau sang thư mục $JBOSS_HOMEbin:
o c:java-wrapperbinWrapper.exe Wrapper.exe
o c:java-wrappersrcbinApp.bat.in JBoss.bat
o c:java-wrappersrcbinInstallApp-NT.bat.in InstallApp-NT.bat
o c:java-wrappersrcbinUninstallApp-NT.bat.inUninstallApp-NT.bat
Chép hai tập tin sau sang thư mục $JBOSS_HOMElib:
o c:java-wrapperlibWrapper.DLL
o c:java-wrapperlibWrapper.jar
Wrapper cần một tập tin cấu hình:
o Tạo thư mục $JBOSS_HOMEconf (JBoss mặc định không có thư mục này)
o Chép tập tin c:java-wrappersrcconfwrapper.conf.in sang thư mục
$JBOSS_HOMEconf và đổi tên thành wrapper.conf
o Tạo thư mục $JBOSS_HOMElogs (tập tin wrapper.conf sẽ tạo một tập tin wrapper.log trong thư mục logs này nhưng JBoss mặc định không có thư mục này).
Thêm vào tập tin wrapper.conf các dòng sau :
o Mục # Java Classpath wrapper.java.classpath.2=%JAVA_HOME%/lib/tools.jar wrapper.java.classpath.3=./run.jar
o Mục # Java Additional Parameters wrapper.java.additional.1=-Dprogram.name=run.bat
o Mục # Application parameters wrapper.app.parameter.1=org.jboss.Main
o Mục # Log file to use for wrapper output logging. wrapper.logfile=%JBOSS_HOME%/server/default/log/wrapper.log
o Mục # Wrapper Windows Properties
<a href="mailto:wrapper.console.title=@app.long.name">wrapper. console.title=@app.long.name@[/code</a>][code]
o Mục # Name of the service wrapper.ntservice.name=JBoss
o Mục # Display name of the service
wrapper.ntservice.displayname=JBoss Application Server
o Mục # Description of the service wrapper.ntservice.description=JBoss Application Server
Khởi động thử JBoss bằng cách chạy tập tin $JBOSS_HOMEbinJBoss.bat. Nếu không có lỗi xảy ra, chạy tập tin $JBOSS_HOMEbinInstallApp-NT.bat để thiết lập JBoss Webserver thành một dịch vụ của Windows.
Để có thể Start/Restart/Stop JBoss, vào Start > Administrative Tools > Services > JBoss Application Server.
Bước 7: Cài đặt MySQL
Tải mysql-5.0.51b-win32.exe tại địa chỉ: http://mysql.com/
Cài đặt MySQL 5.0 vào thư mục C:PKI (hoặc mặc định)
Cấu hình MySQL Server và thiết lập MySQL thành một dịch vụ của Windows.
o Configure the MySQL Server now
o Next
o Chọn Standard Configuration
o Chọn Install As a Windows Service
o Chọn MySQL5 (hoặc để mặc định là MySQL)
o Chọn Include Bin Directory in Windows Path
o Nhấn Next
o Modify Security Settings: 123456 / 123456 (mật khẩu của root)
o Next
o Execute
Bước 8: Cài đặt MySQL Connector/J 5.1 (JDBC Driver)
Tải phiên bản MySQL Connector cho Java 5.1 tại địa chỉ: http://mysql.com/
Tập tin tải được có tên: mysql-connector-java-5.1.6.zip
Giải nén và chép tập tin mysql-connector-java-5.1.6-bin.jar vào thư mục
$JBOSS_HOMEserverdefaultlib
Bước 9: Cài đặt EJBCA
Tải EJBCA phiên bản mới nhất trên ở địa chỉ: http://ejbca.com/
Phiên bản mới nhất tải được có tên: ejbca_3_7_0.zip
Giải nén tập tin này vào thư mục c:pki
Tạo biến môi trường: EJBCA_HOME = c:pkiejbca_3_7_0
Thêm vào biến môi trường Path: c:pkiejbca_3_7_0bin
Vào thư mục c:pkiejbca_3_7_0conf, chép và đổi tên tập tin:
o web.properties.sample thành web.properties
o ejbca.properties.sample thành ejbca.properties
Các thông tin CA mặc định được lưu trong tập tin ejbca.properties:
o ca.name=AdminCA1
o ca.dn=CN=AdminCA1
o ca.keyspec=2048
o ca.keytype=RSA
o ca.signaturealgorithm=SHA1WithRSA
o ca.validity=3650
Trong thư mục c:pki, tạo thư mục ejbca-custom
Bước 10: Thiết lập CSDL MySQL
Tạo cơ sở dữ liệu tên ejbca
o mysqladmin –h localhost –P 3306 –u root –p create ejbca
o 123456
Tạo user ejbca với password ejbca (cấp đầy đủ quyền)
o mysql –u root –p
o 123456
o grant all on ejbca.* to ejbca@'localhost' identified by 'ejbca';
Vào thư mục c:pkiejbca_3_7_0conf, chép và đổi tên tập tin database.properties.sample thành database.properties
Chỉnh sửa file database.properties: bỏ các chú thích phần MySQL:
o database.name=mysql
o datasource.mapping=mySQL
o database.url=jdbc:mysql://127.0.0.1:3306/ejbca?characterEncoding=U TF-8
o database.driver=com.mysql.jdbc.Driver
o database.username=ejbca
o database.password=ejbca
Bước 11: Triển khai hệ thống
Mở cmd, vào thư mục C:PKIejbca_3_7_0 thực hiện các công việc sau:
ant bootstrap (biên dịch mã nguồn ejbca và triển khai vào server ứng dụng)
Khởi động JBoss
ant install (cài đặt ejbca)
Tắt JBoss
ant deploy (chép các tập tin cấu hình và ssl vào JBoss và triển khai lại ejbca)
Khởi động lại JBoss
Bước 12: Đăng nhập vào hệ thống
Bật trình duyệt (browser) gõ http://localhost:8080/ejbca để vào CA.
Để vào được trang quản trị (administration), cần import chứng nhận từ tập tin
$EJBCA_HOMEp12superadmin.p12 vào trình duyệt. Cách thêm vào như sau:
o Với trình duyệt Mozila Firefox 3.0
o Tool > Options...
o Chọn tab Advanced
o Chọn View Certificates
o Trong tab Your Certificates, chọn Import...
o Chọn file superadmin.p12 trong thư mục $EJBCA_HOMEp12
o Nhập mật khẩu mới, ví dụ 123456
o Nhập tiếp mật khẩu: 123456
Triển khai trên môi trường Linux được thực hiện tương tự như trên, tuy nhiên sẽ không có bước tùy chọn 6 (Thiết lập JBoss chạy như một Windows Service).
Các CA con được triển khai tương tự, sau đó gửi yêu cầu đến CA cấp trên để chứng nhận cho nó.