Introduce:
Lesson 7: Butt welding at position 3G Lesson code 15.7
Butt welding in the 3G standing position is a relatively difficult welding position to perform. Therefore, having the knowledge and skills to perform this welding helps us to be confident when performing practical work.
Target:
- Prepare clean welding workpieces and complete welding tools and equipment.
- Calculate welding mode suitable for material thickness, for each welding layer.
- Demonstrate butt welding techniques in position 3G.
- Weld butt welds at 3G position with correct size and technical requirements.
- Check and evaluate the quality of the weld correctly.
- Implement good industrial safety and hygiene work.
Content:
1. Prepare equipment, tools and welding workpiece:
1.1 Reading drawings:
Technical requirements:
- Correct size weld
- The weld is free of defects.
1.2 Prepare equipment and tools:
1.2.1. Equipment:
- 500A AC/DC manual arc welding machine
- Welding rod drying oven 50 kg, Max 350 0 C
- Portable welding rod dryer 5 kg, Max 240 0 C
1.2.2. Tools:
- Auxiliary tools used in welding: wire brush, leather gloves, slag hammer, ruler, forging pliers, square, cold hammer...
- Weld measuring ruler.
1.2.3. Welding blank:
- CT3 steel plate or equivalent with size (200x100x6) mm x 2
plate
2. Calculate welding mode:
2.1 Welding rod diameter:
Apply the formula:
d S 1
2
Replace S = 6 mm with d = 4 mm. To limit possible defects when performing vertical welding, we choose d = 3.2 mm.
2.2 Welding current intensity:
When welding in a vertical position, the liquid metal of the weld pool is subject to the effect of gravity and always tends to fall downwards. To overcome this phenomenon, we must reduce the heat of the weld pool to the allowable limit. Therefore, Ih is reduced by 10 ÷ 15 % compared to flat welding.
Apply the formula:
I = ( β + α.d ).d (A)
In there:
β, α are experimental coefficients, when welding with steel welding rods (β = 20, α = 6) d is welding rod diameter (mm)
Substitute the numbers and we have I = 125 (A). Choose I h = 110 (A).
2.3 Welding voltage:
Apply the formula:
In there:
U h = a + bL hq
a is the total voltage drop across the anode and cathode, a = (15 ÷ 20) V.
b is the total voltage drop per unit length of the arc column, b = 15.7 V/cm.
L hq is the length of the arc column, L hq = 0.32 (cm)
Substituting the numbers, we get: U h = (20 ÷ 25) V. When butt welding, we choose a medium arc, so we choose U h = 22 V.
3. 3G welding technique
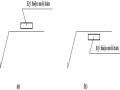
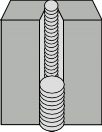
3.1. Vertical position non-beveled butt welding technique:
When welding vertically, the liquid metal in the weld pool always tends to be pulled down by gravity and break out of the weld pool or form a lump. On the other hand, the liquid metal from the tip of the rod flows into the weld pool with difficulty due to the impact of gravity. Therefore, when welding in a vertical position, it is necessary to limit the weight of the weld pool, limit the weight of the metal droplet, increase the buoyancy of the arc and increase the molecular force so that the liquid metal can adhere to the weld pool.
|

Maybe you are interested!
-
 Basic manual arc welding Welding Profession - Lao Cai College - 2
 -
 Practice Exercise 2: Welding “T” Corner Without Chamfer 2 Carbon Steel Plates Using Gmaw Welding Method At 3F Position (S=10Mm)
 -
 T-Bevel Welding Technique Without Bevel Position:
 -
 Low Carbon Steel Welding Rod Symbol According to Japanese Standards (Jis).
 -
 Low Carbon Steel Contact Welding Mode (Single Phase AC)
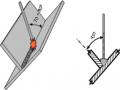
- When welding vertically, the welding rod angle from right to left is 90 0 .
Because the vertical plane below forms an angle of 60 0 ÷ 80 0
Use welding rods with small diameters and welding currents 10 ÷ 15% smaller than welding with the same thickness.
Use short arc for welding, to reduce metal dripping into the hot zone
run.
- Butt welding without bevel is usually done on both sides. How to oscillate the rod
The most suitable welding arc is sawtooth type, semicircular type...
+ Jumping arc type: After each time the molten metal separates from the tip of the welding rod and sticks to the metal of the welding object, it will form a molten zone so that the drops of molten metal that are too hot to solidify in time must move the arc position so that the molten zone has a chance to radiate heat and then move the arc to the molten zone to continue welding. In actual operations, avoid the simple jumping arc type based on the characteristics of the welding rod and the weld, you can apply a combination of the jumping arc type with other types.
When welding in cases where the penetration of the weld is high, the arc heating time on the weld must be shortened to avoid the arc stopping at one point for a long time. The welding speed and the welding rod oscillation do not need to be fast, but must be closely coordinated, using the welding rod feeding speed and arc length to adjust the heat of the melting zone. At the same time, in a unit of time, the appropriate amount of molten metal must be maintained to avoid any defects in the weld. When welding the back side of the large welding current to achieve the melting depth, the welding rod oscillation method applies a sawtooth or semicircular pattern.
3.2. Vertical position beveled butt welding technique:
Usually welded in many layers, the number of layers depends on the thickness of the welded material.
Welding the first layer using welding rod Ф2.5 mm, there are 3 types of welding rod feeding: For thick welding objects, use small triangle welding rod feeding method, for welding objects with moderate or slightly thin thickness, use jumping arc and small semicircle type. From the second layer onwards, it is appropriate to use sawtooth welding rod oscillation method, welding rod diameter from Ф3.2 ÷ Ф4 mm.
For final coating welds, select the appropriate welding rod oscillation method based on the weld surface requirements.
When the weld is high, use the semicircular type, when the weld surface is required to be flat, use the sawtooth type.
Regardless of the method of welding electrode insertion used to weld the first layer, in addition to avoiding defects such as slag, incomplete welding, and edge defects, the weld surface must also be flat and avoid convexity. If the surface is convex, the welding slag can easily be inserted into the gap and cause defects in the next layer.
The way of oscillating the welding rod of the surface weld when welding vertically adjacent to the beveled edge, often using a sawtooth or semicircular style to ensure the weld is aesthetically pleasing and flat. In addition to ensuring the weld thickness is relatively thin, the welding rod speed must be maintained regularly so that the weld meets technical requirements without defects...
* Sequence of performing vertical position non-beveled butt weld:
TT
Job Description | Tools Equipment | Illustration | Requirements achieved | |
1 | Prepare - Read drawings |
| - Grasp the basic dimensions - Understand technical requirements | |
Technical requirements: | ||||
- Correct size weld | ||||
- The weld is free of defects. | ||||
- Check the workpiece, prepare the welding edge | Ruler, hand hammer, hand grinder, steel spreader |
| - Flat, straight blank without pavia - Correct size blank | |
- Mounting bracket | Manual arc welding equipment |
| - Compact, durable, and in the right position | |
- Choose the appropriate layer welding mode |

2
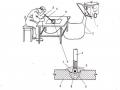
Welding procedure | Manual arc welding equipment |
| - Ensure safety for people and equipment - Sit in the correct position, welding rod at the correct angle - Start and finish the weld properly | |
3 | Check | Weld inspection ruler |
| - Detect weld defects |
* Sequence of performing vertical position beveled butt weld:
TT
Job Description | Tools Equipment | Illustration | Requirements achieved | |
1 | Prepare - Read drawings |
| - Grasp the basic dimensions - Understand technical requirements | |
Technical requirements: | ||||
- Correct size weld | ||||
- The weld is free of defects. |

- Check the workpiece, prepare the welding edge | Ruler, hand hammer, hand grinder, steel spreader |
| - Flat, straight blank without pavia - Correct size blank | |
- Mounting bracket | Manual arc welding equipment | 15 | - Compact, durable, and in the right position - Choose the appropriate layer welding mode | |
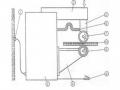
2 | Welding procedure | Manual arc welding equipment |
90 0 | Correct and safe welding operations: - First layer: Weld penetration, flat weld surface - Coating: Ensures the weld is of the correct size and free of defects. |
3 | Check | Weld inspection ruler |
| - Detect the weld defect |

4. How to fix weld defects
TT
Name | Illustration | Reason | How to fix | |
1 | Edge burn |
| - Large welding current - Long arc - Unreasonable stick oscillation | - Reduce current intensity - Use short arc |
2 | Slag |
| - Small welding current - Welding edge cleaning does not meet requirements | - Clean the welding edge thoroughly. - Increase I h |
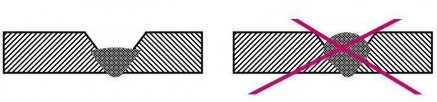
3 | clump |
| - Incorrect welding rod angle - Slow welding speed | - Keep the welding rod angle correct |
5. Methods of testing weld quality:
Inspect the appearance of the weld (with the naked eye or through a magnifying glass) to determine
definition:
- Weld surface.
- Weld width.
- Weld height.
- The start and end points of the weld.
- Measure deviation
- Foot burn measurement
- Measure weld height
6. Occupational safety and industrial hygiene.
- Welding is only allowed when the welder is fully equipped with protective gear.
- Connect enough ground wires for equipment, stop practicing when the workshop floor is wet.
wet. reason.
- Take full safety precautions when performing manual arc welding.
- When detecting a problem, turn off the power and notify the person responsible for handling it.
- Fully implement fire prevention and fighting measures.