1.2 Prepare equipment and tools:
1.2.1. Equipment:
- 500A AC/DC manual arc welding machine
- Welding rod drying oven 50 kg, Max 350 0 C
- Portable welding rod dryer 5 kg, Max 240 0 C
1.2.2. Tools:
- Auxiliary tools used in welding: wire brush, leather gloves, slag hammer, ruler, forging pliers, square, cold hammer...
- Weld measuring ruler.
1.2.3. Welding blank:
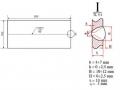
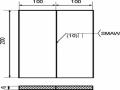
- CT3 steel plate or equivalent with dimensions:
+ (200x100x6)mm x 1 sheet
+ (200x50x6)mm x 1 sheet
2. Calculate welding mode:
2.1. Welding rod diameter:
Apply the formula:
d K 2 2
Substitute K = 3 mm and we have d = 3.5 mm. Because the welding rod is manufactured according to standards, we choose d = 3.2 mm.
2.2 Welding current intensity:
To achieve penetration at the toe of the fillet weld, the current intensity of the T-shaped fillet weld must be increased by 10 ÷ 15% compared to butt welding in the same position. Apply the formula:
I = ( β + α.d ).d (A)
In there:
β, α are experimental coefficients, when welding with steel welding rods (β = 20, α = 6) d is welding rod diameter (mm)
Substitute the numbers and we have I = 125 (A). Choose I h = 135(A).
2.3 Welding voltage:
Apply the formula:
U h = a + bL hq
In there:
a is the total voltage drop across the anode and cathode, a = (15 ÷ 20) V.
b is the total voltage drop per unit length of the arc column, b = 15.7 V/cm.
L hq is the length of the arc column, L hq = 0.32 (cm)
Substituting the numbers, we get: U h = (20 ÷ 25) V. When welding the corner, we choose a short arc, so we choose U h = 21 V.
3. 1F welding technique.
3.1. T-shaped corner welding technique without bevel position:
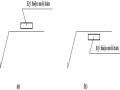
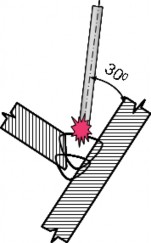
For this type of connection, it is important to achieve penetration in the middle of the weld. Therefore, when welding, the arc is always directed directly to the middle (without fluctuating the welding rod) and the welding speed must be suitable so that the welding slag does not flow back forward. For the weld metal to adhere evenly to both edges, the welding rod must always be located between the two parts and the welding rod must be aligned with the weld axis in the welding direction from 70 ÷ 80 0
Figure 15.2.1 Welding rod angle when welding single-layer corner
Internal corner joint welding can be performed in one of two ways:
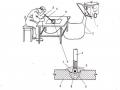
- Push-in welding: the welding rod is pressed against the wall of the two parts. At this time, the welding speed depends largely on the melting speed of the welding rod. To achieve the required weld, it is necessary to adjust the welding speed (moving the welding rod along the weld axis) appropriately.
- Straight welding rod: hold the welding rod at the right angle and go straight along the weld axis (do not press the welding rod against the workpiece). Always keep the arc short during welding.
Of the two methods, the spot welding method is easier to perform, but the weld edge is smaller than the non-spot welding method. The spot welding method is often applied to the first layer of a multi-layer weld.
The beginning of the weld is often pitted because the welding slag easily flows into the gap between the joints. To overcome this phenomenon, when starting the arc, we extend the arc to preheat the weld, then shorten the arc to weld normally. At the end of the weld, we should do a dot break to fill the arc groove.
To ensure flatness, the following steps must be followed to continue the welding process: clean the slag at the joint, ignite the arc directly into the weld pool, quickly increase the arc length and swing the welding rod horizontally. When the weld pool is gone, proceed with normal welding.
3.2. T-shaped corner welding technique with beveled edge position:
For details with thickness S ≥ 6 mm, when welding to ensure penetration, we must bevel one or both sides (vertical plate).
The first layer oscillates the welding rod in a straight line to ensure proper weld penetration. The following layers oscillate the welding rod in a circular pattern.
offset round or serrated with stop. The angle of the welding rod varies with the weld layer.
When welding multiple layers, it is important to ensure penetration between each layer. Therefore, before welding the next layers, the slag of the previous layer must be cleaned, and the welding rod angle must always be maintained at the correct level for each layer.

* Sequence of performing T-shaped fillet weld without bevel at equal position:
TT
Public content job | Tools Equipment | Illustration | Requirements achieved | |
1 | Prepare - Read drawings | Ruler, hand hammer, hand grinder, steel spreader |
Technical requirements: - The weld metal adheres evenly to both edges. - The weld is of the correct size and has no defects. | - Grasp the basic dimensions - Understand technical requirements |
- Check the workpiece, prepare the welding edge |
| - Embryo Flat, straight, no pavia, correct size. - Assembly angle is 90 o |
Maybe you are interested!
-
 Practice Exercise 2: Welding “T” Corner Without Chamfer 2 Carbon Steel Plates Using Gmaw Welding Method At 3F Position (S=10Mm)
 -
 Practical Exercise No. 2: Butt Welding in Upside Down Position 4G with Chamfered Edge of Steel Plate with Thickness S= 10 mm.
 -
 Basic manual arc welding Welding Profession - Lao Cai College - 19
 -
 Basic manual arc welding Welding Profession - Lao Cai College - 2
 -
 Low Carbon Steel Welding Rod Symbol According to Japanese Standards (Jis).
- Mounting bracket | Manual arc welding equipment | - Compact, durable, and in the right position - Choose the appropriate layer welding mode | ||
2 | Welding procedure | Manual arc welding equipment |
| - Ensure safety for people and equipment - Oscillation and angle of each layer stick must be reasonable |
3 | Check | Weld inspection ruler |
| - Detect weld defects |


* Sequence of performing T-shaped fillet weld with beveled edge position:
TT
Job Description | Tools Equipment | Illustration | Requirements achieved | |
1 | Prepare - Read drawings | Ruler, hand hammer, hand grinder, steel spreader |
Technical requirements: - The weld metal adheres evenly to both edges. - The weld is of the correct size and has no defects. | - Grasp the basic dimensions - Understand technical requirements |
- Check the workpiece, prepare the welding edge |
| - Embryo Flat, straight, no pavia, correct size. - Assembly angle is 90 o |


- Mounting bracket | Manual arc welding equipment |
| - Compact, durable, and in the right position - Choose the appropriate layer welding mode | |
2 | Welding procedure | Manual arc welding equipment |
| - Ensure safety for people and equipment - First layer: knife stick movement straight line welding - Coating: welding rod oscillates in a circular pattern round offset or sawtooth. |
3 | Check | Weld inspection ruler |
| - Detect weld defects |
4. Repair of weld defects
TT
Name | Illustration | Reason | How to fix | |
1 | Edge burn |
| - Large welding current - Long arc - Unreasonable stick oscillation | - Reduce current intensity - Use short arc. - Suitable welding rod oscillation |
2 | Slag |
| - Due to low welding current intensity, the arc is unstable. - Welding edge cleaning does not meet requirements | - Increase welding current intensity and weld with short arc - Clean the welding edge thoroughly |
3 | High convex weld |
| - Due to slow welding speed - Low welding current | - Adjust welding speed - Reasonable welding current intensity |
5. Methods of testing weld quality:
Inspect the appearance with the naked eye (or magnifying glass) and check the weld with a ruler to determine:
- Surface and shape of weld scales.
- Edge of the weld.
- Start and end points of the weld.
- Weld defects: Edge burn, slag...
6. Occupational safety and industrial hygiene.
- Welding is only allowed when the welder is fully equipped with protective gear.
- Fully ground the equipment.
- Take full safety precautions when performing manual arc welding.
- Do not remove the welding rod or adjust the welding mode when it is raining.
- Stop practicing when the workshop floor is wet.
- When detecting a problem, immediately turn off the power and notify the person responsible for handling it.
- Fully implement fire prevention and fighting measures.
Exercises and practice products of lesson 15.2
Knowledge:
Question 1 : Describe the preparation and calculation of welding conditions for a T-shaped fillet weld at position 1F with a workpiece thickness of 8 mm.
Question 2: Describe the technique of welding a T-shaped corner with a 1F beveled welding position.
Skill:
Application exercise : 1F corner welding - drawing attached.
- Welding position: 1F
- Welding method: SMAW
- Material: 8mm thick steel plate, CT3 material or equivalent.
- Welding materials:
* SMAW: welding rod Ф2.6, Ф3.2 mm E7016 (LB-52 KOBELCO) or
equivalent.
- Time: 01 hour (including preparation and mounting time)
Technical requirements:
- The weld metal adheres evenly to both edges.
- The weld is of the correct size and has no defects.