Name: combo_car
Items/ Collection/ Enter the names of car brands (eg: Hondan, Yamaha, Suzuki,…)
Maybe you are interested!
-

 Organizing Capacity Training to Develop School Education Programs According to the New General Education Program for Management and Teaching Staff
 -
 Measure 2: Tighten Management of the Development and Implementation of Program Content, Teaching Plans, Education and Training in Disaster Prevention
 -
 Results of Running the Suffix Expression Evaluation Program
 -
 Sales Cost Accounting and Business Management
 -
 Management of training in teaching Physics according to the 2018 general education program for teachers in high schools in Bao Yen district, Lao Cai province - 17
- To create the required “Input” control, do the following:
+ Drag the Button control from the Toolbox window to the Form.
+ Right click on Button, select Properties and set the properties Name: bt_nhap.
Do the same with the controls “Vehicle registered in Nam Dinh”, “Vehicle registered in 2014”, “Vehicle expired”.
- To create a control that lists motorcycle details as required, do the following:
+ Drag the ListView control from the Toolbox window to the Form.
+ Right click on ListView, select Properties and set the properties: Name: listview_detail
Columns/ click on Collection/ click Add 4 times and set the Text property for the corresponding columns as license plate, vehicle manufacturer, vehicle owner, and registration year.
View: Detail GridLine: true
-Write code for events
-Write code to declare motorcycle structure
Public struct Moto
{
string _bienks; string _hangxe; string _chuxe; int _namdk;
public string variables
{
get { return _bienks; } set { _bienks = value; }
}
public string hangxe
{
get { return _hangxe; } set { _hangxe = value; }
}
public string chuxe
{
get { return _chuxe; } set { _chuxe = value; }
}
public int namdk
{
get { return _namdk; } set { _namdk = value; }
}
public Moto(string bienks, string hangxe, string chuxe, int namdk)
{
_bienks = bienks;
_carload = carload;
_car = car;
_namedk = namedk;
}
public bool past_stay()
{
if ( DateTime .Now.Year - namdk > 15) return true; else return false;
}
}
-Write code to declare a motorcycle structure array and integer variable n
Moto [] A = new Moto [100]; int n = 0;
-Write code for the function to disable the buttons
void void void(bool gt)
{
bt_dk2014.Enabled = gt; bt_dknamdinh.Enabled = gt; bt_quahan.Enabled = gt;
}
-Write code for the Load Form event
private void Form1_Load(object sender, EventArgs e)
{
vohieuhoa(false); txt_bienks.Focus();
}
-Write code for the function to check for an empty string
bool check(string s)
{
if (string.IsNullOrWhiteSpace(s)) return true; else return false;
}
-Write code for the function to check input data
bool check()
{
int nam;
if (kiemtra(txt_bienks.Text)||kiemtra(txt_chuxe.Text)||kiemtra(combo_hangxe.Text)||kiemtra(txt_namđk.Text)) return false;
if (txt_namđk.Text.Length < 4 || txt_namđk.Text.Length > 4) return
false;
if (!int.TryParse(txt_namđk.Text, out nam)) return false; return true;
}
-Write code for the function to re-create the textboxes
void reset()
{
txt_bienks.ResetText(); txt_chuxe.ResetText(); combo_hangxe.Text = "" ; txt_namedk.Text = "" ;
}
-Write code for the function to check for valid license plates
bool kt_bienso(string s)
{
if (s.Length < 8 || s.Length > 9) return false;
if ((s[0] >= '0' && s[0] <= '9' ) && (s[1] >= '0' && s[1] <= '9' ))
if((s[2]>= 'a' &&s[2]<= 'z' ) || (s[2]>= 'A' &&s[2]<= 'Z' ))
{
bool kt; kt=true;
for(int i=3;i<s.Length;i++) if (s[i]< '0' ||s[i]> '9' )
{
kt=false; break;
}
if (kt) return true; else return false;
}
return false;
}
-Write code for the click event on the input button
private void bt_click_Click(object sender, EventArgs e)
{
int i;
if (check())
{
vohieuhoa(true);
if (kt_bienso(txt_bienks.Text))
{ Moto
for (i = 0; i < n; i++)
if (string.Compare(A[i].bienks, txt_bienks.Text) == 0) { MessageBox .Show( "Solution control center" ); txt_bienks.Focus(); return; }
if (i == n) { A[n] = X; n++; reset(); } Dua_dulieu_listview(A, n); reset(); txt_bienks.Focus();
}
else { MessageBox .Show( "Incorrect license plate number entered" , "Message" );}
}
else { MessageBox .Show( "Invalid data" , "Message" ); return; }
}
-Write code for the function to put data into listview
private void Dua_dulieu_listview( Moto [] A, int n)
{
list_chitiet.Items.Clear(); for (int i = 0; i < n;i++)
{
ListViewItem item = new ListViewItem (); item.Text = A[i].bienks; item.SubItems.Add(A[i].hangxe); item.SubItems.Add(A[i].chuxe); item.SubItems.Add(A[i].namdk.ToString()); list_chitiet.Items.Add(item);
}
}
-Write code for the click event on the vehicle registration button in Nam Dinh
private void bt_dknamdinh_Click(object sender, EventArgs e)
{
Moto [] b = new Moto [100]; int i, m = 0; for(i=0;i<n;i++)
if (string.Compare(A[i].bienks.Substring(0,2), "18" ) == 0)
{ Moto x = new Moto (A[i].bienks, A[i].hangxe, A[i].chuxe, A[i].namdk);
b[m] = x; m++;
}
Dua_dulieu_listview(b, m);
}
-Write code for the click event on the 2014 vehicle registration button
private void bt_dk2014_Click(object sender, EventArgs e)
{
Moto [] b = new Moto [100]; int i, m = 0;
for (i = 0; i < n;i++)
if (A[i].namedk == 2014)
{ Moto x = new Moto (A[i].bienks, A[i].hangxe, A[i].chuxe, A[i].namdk);
b[m] = x; m++;
}
Dua_dulieu_listview(b,m); }
-Write code for the click event on the expired button
private void bt_quahan_Click(object sender, EventArgs e)
{
Moto [] b = new Moto [100]; int i, m = 0;
for (i = 0; i < n; i++)
if (A[i].overdue())
{ Moto x = new Moto (A[i].bienks, A[i].hangxe, A[i].chuxe, A[i].namdk);
b[m] = x; m++;
}
Dua_dulieu_listview(b, m);
}
Program running results
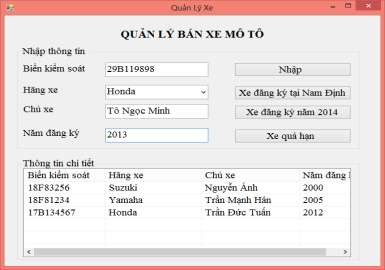
Figure 2.5. Results of running the motorcycle sales management program
Lesson 2
1. Design the Form as shown below:
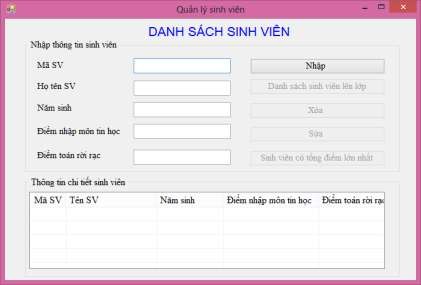
Figure 2.6. Student list form
Request:
- Student list label: Microsoft Sans Serif, font size 16, uppercase, bold, centered on Form, blue.
- Student code label, student name, year of birth, introductory computer science score, discrete math score: Time New Roman font, size 14, black color.
- The boxes to enter student code, student name, year of birth, introductory computer science score, and discrete math score are TextBoxes.
- The controls “Enter”, “List of students going to class”, “Edit”, “Delete”, “Student with the highest total score” are Buttons.
- Control student details is GroupBox
- The control to display the student list is ListView.
2. Programming to perform the tasks:
- Declare student structure including components:
+ Attributes: Student code, student name, year of birth, introductory computer science score, discrete math score.
+ Methods: constructor without arguments, constructor with arguments to initialize an object, promotion method (students are promoted if no subject score is below 5).
- When Loading Form:
+ The controls "List of students promoted to class", "Edit", "Delete", "Student with highest total score" are disabled.
+ The “Enter” control lights up to enable operation.
- When the user clicks the “Enter” button:
+ The controls "List of students going to class", "Edit", "Delete", "Student with highest total score" light up to allow operation.
+ Check the validity of the input data (enter enough information about a student, the year of birth must be a number and must include 4 numbers, discrete math scores, computer science scores must be numbers). If the input data is invalid, a notification dialog box will appear and request re-entry.
+ Check if the student code is already in the list? If the student code is duplicated, a notification dialog box will appear and allow re-entry. If not duplicated, add a new student to the student list.
+ After adding a new employee to the list, reset the textboxes.
+ Display student list on student ListView.
- When the user clicks the “Delete” button:
+ Check if the user has selected the student to be deleted on the Student ListView or not? If not, a dialog box will appear asking for re-selection, and at the same time
information. Otherwise, information about the selected student will be displayed in the corresponding Textbox.
+ When the user clicks on the “Delete” button, a dialog box with 2 Yes/No buttons appears. If the user selects Yes, the student will be deleted from the list and the student list will be updated to the Student ListView and the textboxes in the student information groupbox will be reset. If the user selects No, the deletion will not be performed.
- When the user clicks the “Edit” button:
+ Check if the user has selected the student to be deleted on the Student ListView or not? If not, a dialog box will appear asking for re-selection and notification. Otherwise, information about the selected student will be displayed in the corresponding Textbox.
+ If the Text of this control is "Edit", the cell object to enter the student code is disabled (do not edit the code), change the Text of this control to "Update" and place the cursor in the cell to enter the student's full name.
+ If the Text of this control is “Update”: Check if the data after editing is valid or not? If not, a notification dialog box will appear, allowing editing and the Text of this control will still be “Update”. If the data after editing is valid then:
* The text of this control changes to “Edit”
* The textbox to enter the student code lights up to allow operation.
* Update student information with code matching the student code selected for editing.
* Update student list after editing to Student ListView.
- When the user clicks on the "List of students to be promoted to class" button: Displays the list of students eligible to be promoted to class in the ListView.
- When the user clicks on the button "Student with the highest total score": Displays the list of students with the highest total score in discrete math and introductory computer science in the ListView.
Instructions for implementation
1. Design the Form as required by the assignment
2. Requirements analysis
According to the requirements of the problem, there must be a Form containing:
- Objects with the content "List of students", "Student code", "Student name", "Year of birth", "Introductory score for computer science", "Discrete math score" are Labels.
- The objects for entering student code, student name, year of birth, introductory computer science score, and discrete math score are Textboxes.
- The control to display the student list is a ListView placed in a GroupBox of student details.
- The object to enter student information is GroupBox.
- The buttons "Enter", "List of students going to class", "Edit", "Delete", "Student with the highest total score" are Buttons.
3. Implementation instructions
Design a Form based on the template and attach controls
- To create a STUDENT LIST control as required, you need to do the following:
+ Drag the Label control from the Toolbox window
+ Right click on Label, select Properties and set the properties for Label as follows:
Text: LIST OF STUDENTS
Font: Microsoft Sans Serif Size: 16
Font style: Bold ForeColor: Blue
Do the same with the labels of student name, student code, year of birth, introductory computer science score, and discrete math score.
- To create a GroupBox of student details as required, you need to do the following:
+ Drag the GroupBox control from the Toolbox window to the Form.
+ Right click on GroupBox, select Properties and set the properties for GroupBox as follows:
Text: Student details
Font: Times New Roman Size: 14
ForeColor: Black
Do the same with GroupBox to enter student information.
- To create a control to enter student code as required, you need to do the following:
+ Drag the Textbox control from the Toolbox window to the Form.
+ Right click on Textbox/Properties and set the Name property: txt_masv.
Do the same with the controls for entering student's name, year of birth, discrete math score, and introductory computer science score.
- To create the required “Input” control, do the following:
+ Drag the Button control from the Toolbox window to the Form.
+ Right click on Button, select Properties and set the properties Name: bt_nhập.