so1 = Pop(S, ref top); so2 = Pop(S, ref top); kq = so2 + so1; Push(S, ref top, kq); i++;
Maybe you are interested!
-
 Motorcycle Sales Management Program Running Results
 -
 Initial Results and Comments
 -
 Completing the organization of accounting for revenue, sales costs and determining business results at Hai Phong Paint Joint Stock Company - 1
 -
 Results of Testing Cronbach's Alpha Coefficient of Independent Variable
 -
 Business Results of Quang Binh Tourism Industry in the Period 2014 - 2019
}
else if (st[i] == '-' )
{
so1 = Pop(S, ref top); so2 = Pop(S, ref top); kq = so2 - so1; Push(S, ref top, kq); i++;
}
else if (st[i] == '*' )
{
so1 = Pop(S, ref top); so2 = Pop(S, ref top); kq = so2 * so1; Push(S, ref top, kq); i++;
}
else if (st[i] == '/' )
{
so1 = Pop(S, ref top); so2 = Pop(S, ref top); kq = so2 / so1; Push(S, ref top, kq); i++;
}
else
{
int j = i; gt = 0;
while (j < st.Length && st[j] != ' ' )
{
gt = gt * 10 + (st[j] - 48); j++;
}
push(S, ref top, gt); i = j + 1;
}
}
rtbox_kq.Text = "The value of the suffix expression is: " + Pop(S, ref top).ToString( "F2" );
}
}
- Write code for the function to push an element onto the stack
void Push(float[] S, ref int top, float x)
{
if (top >= max) MessageBox .Show( "Stack day" ); else. else
{
top++;
S[top] = x;
}
}
- Write code for the function to remove an element from the stack
float Pop(float[] S, ref int top)
{
top--;
return S[top + 1];
}
Program running results
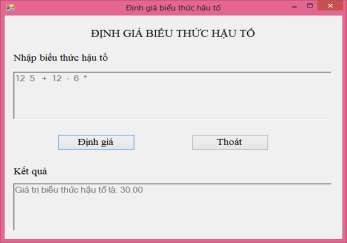
Figure 1.84. Results of running the program to evaluate the postfix expression
1.4.4. Homework
Write a program to do the following tasks:
1. Design Form according to sample
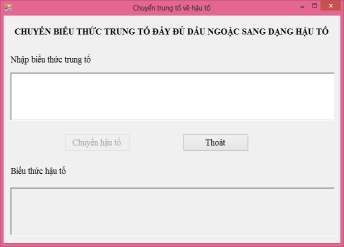
Figure 1.85. Form to convert full infix expression from parentheses to suffix
Request:
- Expression suffix pricing label: Font Time New Roman, uppercase, bold, font size 14, centered Form.
- Input label for infix expression, suffix expression: Font Time New Roman, size
letter 14
- Controls for entering full parenthesized infix expressions and postfix expressions are
RichTextBox.
- The controls “Move suffix”, “Exit” are Buttons.
2. Programming for events:
- When Loading Form:
+ RichTextBox enter full infix expression highlighted brackets enable operation.
+ “Switch suffix” control disabled, “Exit” button always on, result richTextBox always hidden.
- When the user enters an expression into the richTextBox, the suffix conversion button lights up.
- When the user clicks on the “Convert suffix” button:
+ Check if the user has entered an infix expression or not? If not, display a notification dialog and ask for re-entry.
+ RichTextBox input disabled infix expression
+ Convert the full parenthesized infix expression to postfix form and display the postfix expression in the postfix richTextBox.
- When the user clicks the “Exit” button: terminates the program.
LESSON 2. PROGRAMMING ON FORMS TO PROCESS ADVANCED DATA STRUCTURES
Target
After the lesson, students will be able to:
- Knowledge: Know how to design Forms and use C# to program on forms to perform operations on structures and files: create, search, add, delete,...
- Skills: Apply knowledge of design and programming on forms to solve practical problems.
- Attitude:
+ Serious, creative
+ Actively practice
Prepare tools, materials and equipment
Prepare a computer with Windows XP operating system or higher, Microsoft Office software, Vietnamese language editor, Visual Studio 2008 software or higher.
2.1 - Working with structures
2.1.1. Summary of knowledge to remember
1. Define a Struct
[Access_scope] struct Structure_name
{
List of member variables; List of properties;
List_of_methods;
}
2. Declare structure variable
Structure_name Structure_variable_name = new Structure_name();
For example: Diem A = new Diem(); // Call the constructor without parameters or Diem B = new Diem(30,10); // Call the constructor with two parameters Note:
If we do not create a constructor, an implicit default constructor will be created by the compiler and the default value of member variables is 0.
In C#, the new keyword does not always create objects on the Heap. Classes are created on the heap, while structures are created on the stack. Also, when new is omitted, the constructor is not called. Since C# requires assignment before use, all member variables must be explicitly initialized before using them in a structure.
3. Access to member variables of structure variables
Structure_variable_name. Component_variable_name Example: Diem A= new Diem(20, 40);
Ax // access the x component of variable A
4. Copy structure variables
C# allows initialization or assignment of one structure variable to another structure variable.
For example: Point A = new Point(10,20); Point B; B = A;
5. Structured array
a. Declare a structure array:
Structure_name [] Array_name= new Structure_name [size]; Example: Diem [] A= new Diem[50];
b. Accessing the member variables of a structure array:
Array_name[index].component_variable_name; Example: A[2].x ;
2.1.2. Sample exercises
Write a program to do the following tasks:
1. Design the Form as shown below
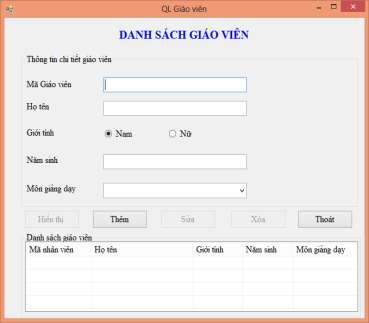
Figure 2.1. Primary school teacher management form
Request:
- Teacher list label: Font Time New Roman, size 16, uppercase, bold, centered on Form, blue.
- Teacher code, full name, gender, year of birth, subject taught: Font Time New Roman, size 14, black.
- The boxes to enter Teacher Code, full name, and year of birth are TextBoxes.
- The controls to select the gender Male and Female are radioButtons
- The controls “Add”, ”Show”, “Edit”, “Delete”, ”Exit” are Buttons.
- Control the teacher list is GroupBox
- The control to display the list of teachers is ListView.
- The control to select the subject to teach is ComboBox.
2. Programming to perform the tasks:
- Declare the teacher structure type of an ABC elementary school with the following attributes: teacher code, full name, gender, year of birth, subject taught. Constructors without arguments, with arguments, and copy constructors to initialize objects
- When Loading Form:
+ The “Edit”, “Delete”, “Show” controls are disabled.
+ The “Add” and “Exit” controls light up to enable operation.
- When the user clicks the “Add” button
+ The “Edit”, “Delete”, “Show” controls light up to allow operation
+ Check the validity of the input data (enter enough information about a teacher, the year of birth must be a number and must have 4 digits). If the input data is invalid, a notification dialog box will appear and request re-entry.
+ Check if the teacher code is already in the list? If the teacher code is duplicated, a notification dialog box will appear and allow re-entry. If not duplicated, add a new teacher to the teacher list.
+ After adding a new employee to the list, the textboxes are left blank.
- When the user clicks on the “Show” button: Displays the teachers' information in the ListView of teachers.
- When the user clicks on an element on the ListView, information about the selected teacher will be displayed on the corresponding textboxes, radiobuttons, and comboboxes.
- When the user clicks the “Delete” button:
+ Delete teachers with codes that match the selected teacher code on ListView from the teacher list (catch errors when the user has not selected an element on ListView)
+ Update the list of teachers after deleting to the ListView of the list of teachers
pill
+ Textboxes and comboboxes are left blank.
- When the user clicks the “Edit” button:
+ If the Text property of this control is “Edit”, then the cell object for entering the code
The teacher disables (does not edit the code), changes the Text property of this control to “Update” and places the cursor in the teacher's name input box.
+ If the Text property of this control is “Update”: Check if the data after editing is valid or not? If not, a notification dialog box appears, allowing editing and the Text property of this control is still “Update”. If the data after editing is valid then:
* The Text property of this control changes to “Edit”.
* Update the teacher's information with the same code as the selected teacher's code to fix (catch the error when the user has not selected an element on the ListView)
* Update the teacher list after editing to the ListView of teacher list.
* The cell object for entering the teacher code lights up to allow operation.
Instructions for implementation
1. Design the Form as required by the assignment
2. Requirements analysis
According to the requirements of the problem, there must be a Form containing:
- Objects with the content "List of teachers", "Teacher code", "Full name", "Gender", "Year of birth", "Subject taught" are Labels.
- The input box for teacher code, full name, year of birth, gender, and teaching subjects are Textboxes.
- The controls to select male and female gender are RadioButtons.
- The control to display the teacher list is a ListView placed in a GroupBox of teacher list.
- The control to select the subject to teach is ComboBox.
- The buttons “Add”, “Delete”, “Edit”, “Show”, “Exit” are Buttons.
- The teacher details control is a GroupBox.
3. Implementation instructions
- Design Form according to the template and attach controls
+ Drag the Label control from the Toolbox window
+ Right click on Label, select Properties and set the properties for Label as follows:
Text: LIST OF TEACHERS
Font: Times New Roman Size: 16
Font style: Bold ForeColor: Blue
Do the same with the labels of name, teacher code, gender, year of birth, and subject taught.
- To create a GroupBox with detailed teacher information as required, you need to do the following:
+ Drag the GroupBox control from the Toolbox window to the Form.
+ Right click on GroupBox, select Properties and set the properties for GroupBox as follows:
Text: Teacher details Font: Time New Roman
Size: 14 ForeColor: Black
Do the same with the teacher list GroupBox.
- To create a control to enter teacher code as required, you need to do the following:
+ Drag the Textbox control from the Toolbox window to the Form.
+ Right click on Textbox/Properties and set the Name property: txt_magv.
Do the same with the controls for entering your first and last name and year of birth.
- To create a control that selects the gender as Male:
+ Drag the RadioButton control from the Toolbox window to the Form.
+ Right click on RadioButton/Properties and set the properties:
Name: radio_nam checked: True
Do the same with the control selecting the gender as Female.
- To create the required “Add” control, do the following:
+ Drag the Button control from the Toolbox window to the Form.
+ Right click on Button, select Properties and set the properties Name: bt_them.
Do the same with the “Delete”, “Edit”, “Show”, “Exit” controls.
- To create a control to list teachers on demand, you need to do the following:
+ Drag the ListView control from the Toolbox window to the Form.
+ Right click on ListView, select Properties and set the properties: Name: listview_giaovien
Columns/ click on Collection/ click Add 5 times and set the Text property for the corresponding columns to teacher code, full name, gender, year of birth, and subject taught.
View: Detail GridLine: true
- To create a control to select a teaching subject according to the request, you need to do the following:
+ Drag the ComboBox control from the Toolbox window to the Form.
+ Right click on ComboBox /Properties and set the properties: Name: combo_mongd
Items/ Collection/ Enter the names of the subjects taught.
Form design results