How to apply a backup of the differential backup process on day 3.
3) Transaction log backup:
Full back up and differential backup processes take up a lot of system resources and affect system performance, so they are often performed after working hours. However, this can lead to data loss during a working day if the database has a problem before the backup process takes place. Transaction log backup is a solution to minimize the amount of data that can be lost when there is a database problem.
During operation, SQL Server uses transaction log to track all changes to the database. Log ensures that the database can recover from unexpected failures and also ensures that users can roll back the results of database transactions. Incomplete transactions are stored in the log before being permanently stored in the database.
Maybe you are interested!
-

 The Scope of Entities Entitled to File a Bankruptcy Petition Is Still Too Narrow
 -
 Issues Raised From Criticizing Viewpoints Denying the Path to Socialism in Vietnam.
 -
 Mapreduce And Hdfs (Optimal Features Of Mapreduce When Combined With Hdfs):hdfs Is Just A Distributed File System With Management Mechanisms Inside It.
 -
 Create New Data Table From Select Statement Results
 -
 The Path to Developing Organizing Skills for Kindergarten Teachers
Transaction log backup backs up the database transaction log to storage. Each time the transaction log is backed up, SQL Server discards the committed transactions and writes the transactions to the backup media. Transaction log backups use much fewer system resources than full backups and differential backups, so transaction log backups can be used at any time without affecting system performance.
Let’s go back to the example of the admissions management database. The university performs a full backup on Friday evenings and a differential backup on Monday through Thursday evenings. The university additionally performs a transaction log backup every hour. Suppose the database crash occurs at 9:05 a.m. on Wednesday. The process to restore the database is as follows: Use the full backup and differential backups from Friday night and Tuesday evening to restore the database to its state on Tuesday evening. However, this process still results in a 2-hour data loss (7:00 a.m. – 9:00 a.m.) on Wednesday morning. Next, use the 2 transaction backups at 8:00 a.m. and 9:00 a.m. to restore the database to its state at 9:00 a.m. on Wednesday.
6.1.2. Perform backup
Step 1: Select database/Right click/Select Tasks/Select Back up….
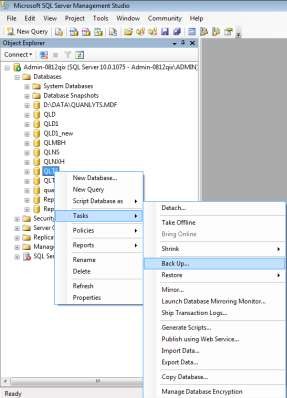
Figure 6.1. Database backup
Step 2: Select Backup type in Backup type
- Select Full if you want to create a Full Backup copy
- Select Differential type if you want to create a Differential copy
- Select Transaction Log type if you want to create a copy of the Transaction Log
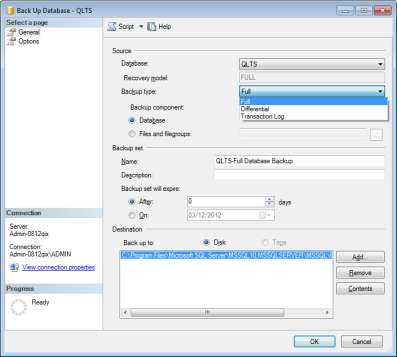
Figure 6.2. Database backup types
Step 3: Select the backup component in the Backup component section
- Database option (default): Allows creating a copy to back up everything the database has.
- Files and filegroups option: Allows selecting a copy of the data file. We can select files in the file group (*.mdf, *.ndf): including main files and extension files.
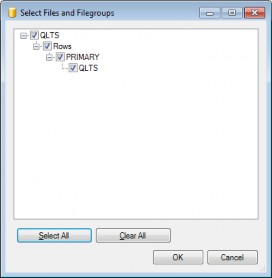
Figure 6.3. Backup file
In the directory tree select the files to backup. The Copy Only Backup check box allows to backup a copy of the database without recording the copy process to serve the process of restoring the database from this copy.
Step 4: Set the backup time in Backup set will expire set the backup time
- The default After option will give us a copy of the data as soon as we click OK to accept.
receive.
- On option to specify backup time. We can set the time for the system to
The system automatically backs up at that time.
Step 5: Select the file storage location in the Destination section:
- Select the Disk option to save the file to disk.
- The default backup file path and storage location have been declared in the Destination section. If you want to change the path, you can select Remove to remove the default path. Then select Add to enter a different file name and storage location.
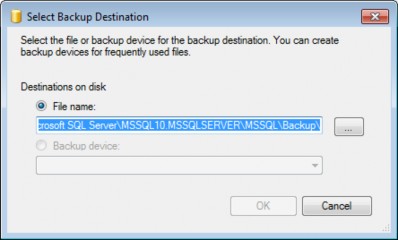
Figure 6.4. Select the backup file storage path
- Click  to select the storage location
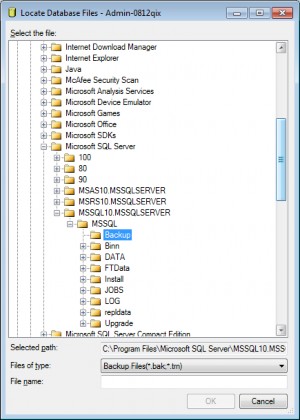
Figure 6.5. Select the folder to save the backup file
+ Select the storage folder on the directory tree.
+ Enter the backup file name in the File name field.
6.2. Database recovery
6.2.1. Concept
Data recovery is the process of restoring a database whose data has been previously backed up. When a database in operation encounters problems due to objective or subjective factors, restoring previously backed up data is always the top priority.
to restore the database for the application so that users can continue working. In some cases, if we want to recover the database based on the previous backup, we also restore them. We can restore data from Full backup files, Differential backup files, file backups, and copy backups.
6.2.2. Performing recovery
Step 1: Select Database pane/Select database/Right click/Select Task/Select Restore/Select Database.

Figure 6.6. Data recovery operation
Step 2: Select the restore source in the Source of restore section
- Copy from database, select Database: The previous qlts database was created into two copies, Full and Differential. If you want to back up all data from the most recent backup, select both files as shown above. If you want to get older data, just select the Full backup file.
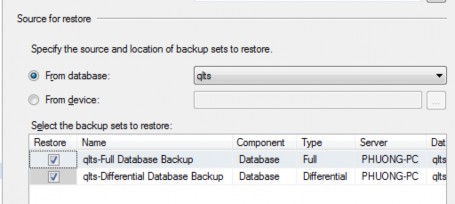
Figure 6.7. Select the source database to restore
- Copy from file select From device:
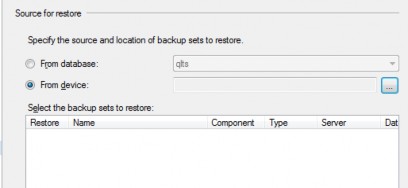
Figure 6.8. Recovering data from storage devices
- Click  to select the backup file name
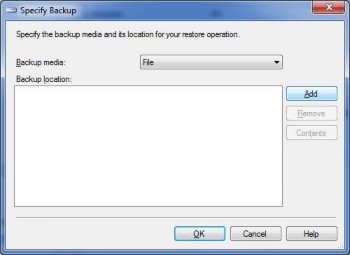
Figure 6.9. Add backup file
- Select the Add button to select a file in the directory tree.
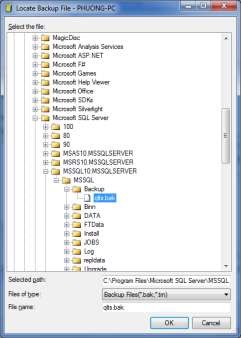
Figure 6.10. Select the backup file to restore
- Select the copy file/ Select OK. Then, return to screen 6.9.
- Select OK. Return to the Restore screen. Check the backup file in the Restore column.

Figure 6.11. Select backup file
Step 3. Select OK. If the recovery is successful, you will receive a notification.
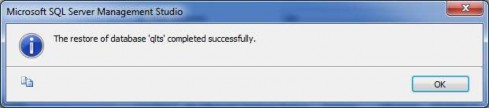
Figure 6.12. Successful recovery notification
6.3. Develop a database backup plan
Whenever an incident occurs, the risk of data loss may be related to the backed up files. In some cases, unexpected incidents can result in the loss of both backed up files and running databases. Copying backed up files to another drive or dedicated device is the best way to avoid risks. In addition, creating backup files periodically is also a way for you to avoid risks. To ensure that when an incident occurs, you have the latest copy to restore, you must create a backup plan, which will be executed according to a predetermined schedule. To implement a backup plan, you need to do two things:
- Declare detailed plan corresponding to schedule.
- Declare backup operations for detailed plan.
6.3.1. Create a detailed plan
Creating a detailed backup plan is the process of planning for data backup. A plan can include multiple schedules. Each schedule is considered a subplan. Each subplan can set up a schedule for backup time. We can plan backups for each day of the week, for each day or for each month. Depending on the nature of the database, the backup schedule has databases that need to be backed up after each working day, but there are also databases that are specified weekly or periodically every month and quarter. Work
Backups are usually performed at the end of a session to avoid affecting performance.
Backup plans are managed by the SQL Server Agent service. Therefore, to be able to execute this plan, the SQL Server Agent service needs to be set to running status.
Steps to create a backup plan:
Step 1: In Object Explore, Select Management/ Select Management Plans/ Right click/ Select New Mainternance Plan.
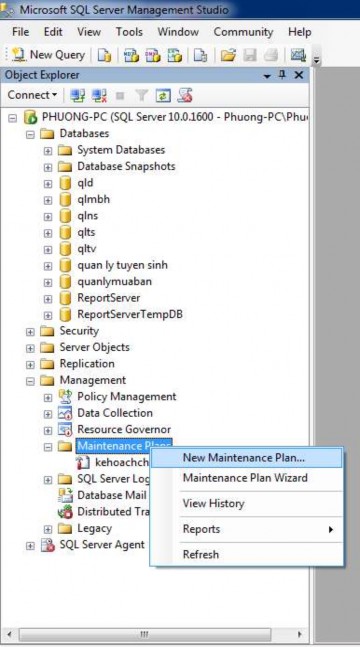
Figure 6.13. Select the New Mainternance Plan function