PREFACE
In order to meet the requirements of theory linked to practice, improve training quality, improve skills and to unify teaching content with research materials for lecturers and students to practice the subject of Cold Practice, contributing to industrialization. The Cold Practice lecture series was born to meet part of that requirement.
Cold Practice is a specialized subject that has been developed according to the new program of the Ministry of Education and Training for technology schools. This is a compulsory subject that has been included in the teaching of technology universities.
The lecture series " Cold Practice " is compiled in accordance with the subject program approved by the Scientific Council of Nam Dinh University of Technology and Education. The lecture series ensures scientific, basic, and modern qualities, will meet the learning and research needs of students and create consistency in the teaching process of lecturers participating in teaching this subject.
During the compilation process, our group has closely followed the curriculum issued by the school, and tried to present basic, modern content associated with technology. However, due to capacity and time constraints, errors are inevitable. We look forward to receiving sincere contributions from colleagues and readers to make the lecture series more and more complete.
Author Group
Index
FOREWORD i
LESSON 01. EQUIPMENT - TOOLS FOR MAKING IMPRESSIONS AND CUTTING METAL WITH
HAND SAW 1
A. Teaching aids and equipment 1
1. Vehicle: 1
2. Equipment 1
B. Practice lesson 1
1. Lesson 1 objectives
2. Lesson 2 content
2.1. Basic tools and equipment at cold shop 2
2.2. Take mark 4
2.3 Cutting metal with a hand saw 9
3. Organize skill training 12
3.1. Practice requirements 12
3.2. Sequence of processing steps 12
4. Self-study guide 14
LESSON 02. CHILLING PLANE 15
A. Teaching aids and equipment 15
B: Do lesson 15
1. Lesson 15 objectives
2. Lesson 16 content
2.1. Metal punch 16
2.2. Flat surface chiseling 19
2.3. Check the chiseled surface 19
2.4. Sequence of chiseling plane 19
2.5. Types of failures - causes and prevention 19
2.5. Note 19
3. Organize skill training 20
3.1. Practice requirements 20
3.2. Sequence of processing steps 20
4. Self-study guide 21
LESSON 03. FILE FLAT SURFACE 22
A. Teaching aids and equipment 22
B. Practice lesson 22
1. Lesson Objective 22
2. Lesson content 23
2.1. Metal file 23
2.2 Flat surface filing 26
2.3. Check the file surface 27
2.4. Types of failures - causes and prevention 27
2.5. Flat surface filing sequence 27
2.6. Note 28
3. Organize skill training 28
3.1. Practice requirements 28
3.2. Sequence of processing steps 28
4. Self-study guide 29
LESSON 04. FILE TWO PARALLEL PLANES 30
A. Teaching aids and equipment 30
B. Practice lesson 30
1. Lesson Objective 30
2. Lesson content 31
2.1. Filing two parallel planes 31
2.2. Method of filing two parallel planes 31
2.3. Checking parallelism of two planes 32
2.4. Types of failures - causes and prevention 33
3. Organize skill training 34
3.1. Practice requirements 34
3.2. Sequence of processing steps 34
4. Self-study guide 35
LESSON 05. FILE TWO PERCEPTUAL PLANES 36
A. Teaching aids and equipment 36
B. Practice lesson 36
1. Lesson Objective 36
2. Lesson content 37
2.1. File two perpendicular planes 37
2.3. Check the squareness of two planes 38
2.4. Types of failures - causes and prevention 38
3. Organize skill training 39
3.1. Practice requirements 39
3.2. Sequence of processing steps 39
4. Self-study guide 41
LESSON 06. METAL DRILLING AND THREAD CUTTING 42
A. Teaching aids and equipment 42
B. Practice lesson 42
1. Lesson Objective 42
2. Lesson content 43
2.1. Metal Drilling 43
2.2. Thread cutting 46
2.3. Types of failures - causes and prevention 49
3. Organize skill training 51
3.1. Practice requirements 51
3.2. Sequence of processing steps 51
4. Self-study guide: 53
LIST OF DRAWINGS ................................................................
REFERENCES AND USER MANUAL 60
LESSON 01
EQUIPMENT - TOOLS
MARKING, CUTTING METAL WITH HAND SAW
Time to complete: 6 periods Previous lesson name:
Performed from date........ to date..........
A. Teaching facilities and equipment
1. Means:
Lesson plans, outlines, chalk, projector, drawings, ...
2. Equipment:
TT
Name and technical specifications of equipment, tools; raw materials and fuels loss | Unit | SL | Note | Additional | |
1 | Equipment, tools (for 01 student) | ||||
Vise mounted on cold table | Female | 01 | Use next | ||
Impression tools: marking tip, marking dot, hand hammer, marking pad, impression table | Female | 01/ 4 SV | Continued use | ||
Cutting tool: hand saw | Female | 01/ 4 SV | Continued use | ||
Measuring tool: ruler | Set | 01 | Use next | ||
2 | Raw materials, consumables (for 01 SV) | ||||
- CT3 steel 22 has l = 25mm - 3mm corrugated iron sheet | Paragraph | 01 | Continued use | ||
- Cleaning cloth | Kg | 0.2 | Cancel | ||
3 | Other |
Maybe you are interested!
-

 Enforcement of fines from practice in District 2, Ho Chi Minh City - 8
 -
 Crime of rape of people under 16 years old from the practice of Soc Trang province - 10
 -
 Characteristics of the Practice of the Right to Prosecute During the Investigation Stage of a Case of Intentionally Causing Injury or Harm to the Health of Another Person.
 -
 Practice database programming with VB.net - 39
 -
 Practice of Determining the Crime of Resisting a Law Enforcement Officer According to the CU Increases the Aggravated Penalty
B. Implement the lesson
1. Lesson objectives
After completing this lesson, students will be able to:
* About knowledge:
- Know the equipment and basic tools of the profession.
- Select tools for taking impressions and cutting metal.
* About skills:
- Maintain a reasonable workplace arrangement.
- Take the leak mark, accurately.
- Can cut metal with a hand saw to ensure accuracy and straight saw lines
* About attitude:
Serious and proactive in learning and practicing industrial production style. Ensure labor safety and environmental hygiene.
2. Lesson content
2.1. Basic tools and equipment in the cold shop
2.1.1 . Workplace equipment:
a. Cold table:
Cold table requirements: Sturdy, vibration-free, little movement, with tool drawers, drawing racks, and lighting.
+ There are two popular types of tables:
- Single cold table: for one person to work (Image 1)
Dimensions: Height 700 to 900mm, length 1500 to 2000mm, width 800 to 100mm, wooden or steel legs, thick wooden surface, table edge made of angle steel with mesh.
- Double cold table: For two or more people working together (Image 2)
Dimensions: Height 750 to 900 mm, length greater than or equal to 1500 mm, width from 1200 to 1500 mm, table top made of 50 to 60 mm thick hardwood. Safety net is placed in the middle of the table.
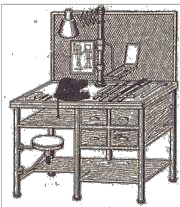
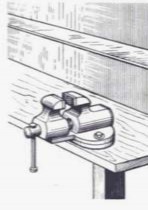
Figure 1: Single cold table Figure 2: Double cold table
b . Vise: Is a tool for clamping during machining. There are three types of vises for cold machining:
- Leg vise (Figure 3) : Has two long legs that are firmly attached to the cold table legs thanks to the clamp holder. The two clamping jaws are roughened to increase friction and resist wear during operation.
- Parallel vise (Figure 4): When moving, the two clamping jaws are always parallel to each other, the vise is firmly fixed on the cold table by bolts on the base. This type of vise is used to process precision parts.
- Hand vise (Figure 5): Hand vise used to process and clamp small sized parts.

Figure 3: Foot vise Figure 4: Parallel vise Figure 5: Hand vise
After use, the vise must be cleaned and turned so that the two cheeks touch each other. Only use your hand to turn the crank to clamp or remove objects.
c. Two-stone grinder
It is a device used to fix machining tools such as chisels, scrapers, marking bits, etc.
When working with a grinder, check the machine's mechanisms and components, the condition of the grinding wheel and the direction of rotation of the wheel. Check the clearance of the support base, make sure the clearance between the support base and the wheel is not more than 3mm, otherwise, readjust.
Note:
- Only adjust the clearance of the bearing when the stone is stationary.
- Never grind without a safety guard and cover.
- Must wear safety glasses and goggles when grinding.
d. Drilling machine:
Drilling machines used in cold industry are mainly used to process holes. Depending on shape and use, they are divided into:
- Bench drill
- Vertical drilling machine
- Drilling machine
2.1.2. Commonly used tools a. Functional tools:
+ Cold hammer: Used to transmit impact force from the arm to the cutting tool.
- Hammer structure consists of two parts:
Hammer body is made of steel. The head is hardened and weighs 50g, 100g, 200g, 300g, 400g, 500g, 600g.
Hammer handle: made of good wood, tough and impact resistant, hammer handle length 200 to 350mm.
b. Machining tools
- Chisel : A cutting tool used to remove thick layers of metal without requiring high precision. Chisel is made of tool steel.
- File : Is a cutting tool when it is necessary to remove a thin layer of metal, to process objects with low precision and gloss. The file is made of carbon tool steel. After use, before storing, use a wire brush to brush off all the shavings on the file body.
- Hand saw : A hand tool used to cut workpieces. After use, loosen the saw blade tension nut.
c. Measuring and testing instruments
+ Ruler (Figure 6)
+ Caliper (Figure 7)

Figure 6: Ruler

Figure 7: Caliper
+ Protractor
+ Level checker
+ Dial gauge
Measuring and testing instruments must be kept carefully, avoiding impact. After use, they must be cleaned, greased, and not stacked on top of each other.
2.2. Take impression
Marking is using a tool to draw lines on the workpiece (detail) to determine the location of the surfaces and dimensions that need to be machined according to the requirements given in the detailed drawing to be manufactured.
Take flat mark .