pineapple, soursop. In the Mekong Delta, sticky bugs also appear on coconut, guava, mango, and cycads.
* Harmful symptoms
On citrus trees, aphids often appear in white patches, they often attack the main trunk and branches of the tree. High density of aphids and occurring over a long period of time cause the bark of the tree to dry and crack, the cracks open the way for other pests to invade and damage the tree.
The attack of aphids reduces the growth and development of plants. In case the aphids cause severe damage to small branches or young trees, the leaves can turn yellow and fall off, causing the branches or the whole tree to die. Aphids also attack and damage leaves and fruits when the density is high, reducing the yield and quality of the fruit. Their excrement contains many nutrients, especially sugar, creating conditions for sooty mold to develop on the trunk and leaves. Aphids also transmit viruses to citrus trees.
* Morphological and biological characteristics
Maybe you are interested!
-

 Research on treatment of rotator cuff tears using modified Mason-Allen tendon endoscopic suturing technique and creating micro-damage at the attachment area - 2
 -
 Damage Phenomenon, Causes, Remedies
 -
 Developing craft village tourism in Thai Nguyen specialty tea regions - 15
 -
 Car body electrical practice - 8
zt2i3t4l5ee
zt2a3gs
zt2a3ge
zc2o3n4t5e6n7ts
If the voltage is out of specification, replace the wire or connector.
If the voltage is within specification, install the front fog light relay and follow step 5.
Step 5 Check the front fog light switch
- Remove the D4 connector of the fog light switch
- Use a multimeter to measure the resistance of the front fog light switch.
Measurement location
Condition
Standard
D4-3 (BFG) -D4-4 (LFG)
Light switchFront Fog OFF
>10kΩ
D4-3 (BFG) -D4-4 (LFG)
Front fog light switchON
<1 Ω
- Standard resistor
D4 connector is located on the combination switch assembly.
If the resistance is out of specification, replace the combination switch (the fog light switch is located in the combination switch).
If the resistance is within specification, follow step 6.
Step 6 Check wiring and connectors (front fog light relay-light selector switch)
- Disconnect connector D4 of the combination switch assembly
- Use a voltmeter to measure the voltage value of jack D4 on the wire side.
Measurement location
Control modecontrol
Standard
D4-3 (BFG) - (-) AQ
TAIL
11 to 14 V
D4 connector for the wiring of the combination switch assembly
If the voltage does not meet the standard, replace the wire or connector.
If the voltage is within standard, there may have been an error in the previous measurements.
Step 7 Check the front fog lights
- Remove the front fog light electrical connector.
- Supply battery voltage to the fog lamp terminals
Jack 8, B9 of front fog lamp on the electrical side
blind first.
Power supply location
Terms and Conditions
Battery positive terminal - Terminal 2Battery negative terminal - Terminal 1
Fog lightsbefore morning
- If the light does not come on, replace the bulb.
If the light is on, re-plug the jack and continue to step 8.
Step 8 Check wiring and connectors (relay and front fog lights)
- Disconnect the B8 and B9 connectors of the front fog lights.
- Use a voltmeter to measure voltage at the following locations:
Measurement location
Switch location
Terms and Conditions
B8-2 - (-) AQ
Electric lock ON TAIL size switchFog switch ON
11 to 14 V
B9-2 - (-) AQ
Electric lock ONTAIL size switch Fog switch ON
11 to 14 V
B8 and B9 connectors on the front fog lamp wiring side
Voltage is not up to standard, repair or replace the jack. If up to standard, there may have been an error in the measurement process.
2.2.4. Procedure for removing, installing and adjusting fog lights 1. Procedure for removing
- Remove the front inner ear pads
Use a screwdriver to remove the 3 screws and remove the front part of the front inner ear liner
-Remove the fog light assembly
+ Disconnect the connector.
+ Use a screwdriver to remove 3 screws to remove the fog light cover
2. Installation sequence
-Rotate the fog lamp bulb in the direction indicated by the arrow as shown in the figure and remove the fog lamp from the fog lamp assembly.
-Rotate the fog light bulb in the direction indicated by the arrow as shown in the figure and install the light into the fog light assembly.
- Use a screwdriver to install the fog light cover
-Install the electrical connector
Attention: Be careful not to damage the plastic thread on the lamp assembly.
- Install the front inner ear pads
Use a screwdriver to install the front inner bumper with 3 screws.
3. Prepare the vehicle to adjust the fog light convergence. Prepare the vehicle:
- Make sure there is no damage or deformation to the vehicle body around the fog lights.
- Add fuel to the fuel tank
- Add oil to standard level.
- Add engine coolant to standard level.
- Inflate the tire to standard pressure.
- Place spare tire, tools and jack in original design position
- Do not leave any load in the luggage compartment.
- Let a person weighing about 75 kg sit in the driver's seat.
4. Prepare to check the fog light convergence
a/ Prepare the vehicle status as follows:
- Place the car in a dark enough place to see the lines. The lines are the dividing line, below which the light from the fog lights can be seen but above which it cannot.
- Place the car perpendicular to the wall.
- Keep a distance of 7.62 m between the center of the fog lamp and the wall.
- Park the car on level ground.
- Press the car down a few times to stabilize the suspension.
Note: A distance of approximately 7.62 m is required between the vehicle (fog lamp center) and the wall to adjust the convergence correctly. If the distance of 7.62 m cannot be achieved, set the correct distance of 3 m to check and adjust the fog lamp convergence. (Since the target area varies with the distance, please follow the instructions as shown in the figure.)
b/ Prepare a piece of thick white paper about 2 m high and 4 m wide to use as a screen.
c/ Draw a vertical line through the center of the screen (line V).
d/ Set the screen as shown in the picture. Note:
- Keep the screen perpendicular to the ground.
- Align the V line on the screen with the center of the vehicle.
e/Draw the reference lines (H, V LH and V RH lines) on the screen as shown in the figure.HINT:
Mark the center of the fog lamp on the screen. If the center mark cannot be seen on the fog lamp, use the center of the fog lamp or the manufacturer's name mark on the fog lamp as the center mark.
H line (fog light height):
Draw a line across the screen so that it passes through the center mark. Line H should be at the same height as the center mark of the fog light bulb.
Line V LH, V RH (center mark position of left fog lamp LH and right fog lamp RH):
Draw two lines so that they intersect line H at the center marks.
5. Check the fog light convergence
a/ Cover the fog lamp or remove the connector of the other side fog lamp to prevent light from the unchecked fog lamp from affecting the fog lamp convergence test.
b/ Start the engine.
c/ Turn on the fog lights and make sure that the dividing line is outside the standard area as shown in the drawing.
6. Adjust the fog light convergence
Use a screwdriver to adjust the fog light to the standard area by turning the toe adjustment screw.
Note: If the screw is adjusted too far, loosen it and then tighten it again, so that the last rotation of the light adjustment screw is clockwise.
3. Self-study questions
1. Describe the operating principle of the lighting system with automatic headlight function
2. Describe the operating principle of the lighting system with the function of rotating headlights when turning
3. Draw diagram and connect lighting system on Hyundai Porter car
4. Draw diagram and connect lighting system on Honda Accord 1992
5. Draw the lighting circuit on a 1993 Toyota Lexus
LESSON 3 MAINTENANCE AND REPAIR OF SIGNAL SYSTEM
I. IMPLEMENTATION GOAL
After completing this lesson, students will be able to:
- Distinguish between types of signals on cars
- Correctly describe common symptoms and suspected areas causing damage.
- Connecting signal circuits ensures technical requirements
- Disassemble, install, check, maintain and repair the signal system to ensure technical requirements.
- Ensure safety in work and industrial hygiene
II. LESSON CONTENT
1. General description
The signal system equipped on cars aims to create signals to notify other vehicles participating in traffic about the vehicle's operating status such as: stopping, parking, braking, reversing, turning...
Signals are used either by light such as headlamps, brake lights, turn signals….. or by sound such as horns, reverse music….
Just like the lighting system. A signal system circuit usually consists of: battery, fuse, wire, relay, electrical load and control switch. Only some switches of the signal system are on the combination switch. The switches of other signals are usually located in different locations such as in the gearbox or brake pedal……
2. Maintenance and repair
2.1. Turn signals and hazard lights
The installation location of the turn signal is shown in Figure 3.1. The turn signal control switch is located in the combination switch under the steering wheel. Turning this switch to the right or left will make the turn signal turn right or left.
The hazard light switch is used when the vehicle has a problem while participating in traffic. When the hazard light switch is turned on, all the turn signals on the vehicle will light up at a certain frequency. The hazard light switch is usually placed separately from the turn signal switch (some old cars integrate the hazard and turn signal switches on the same combination switch cluster).
Figure 3.1 Turn signal switch Figure 3.2 Hazard switch
The part that generates the flashing frequency for the lights is called a turn signal relay. The turn signal relay usually has 3 terminals: B (positive power supply); E (negative power supply); L (providing the turn signal switch to distribute to the
lamp)
2.1.1. Circuit diagram
To generate the frequency for the turn signal, a turn signal relay is used in the turn signal circuit. The current from the turn signal relay will be sent to the turn signal switch assembly to distribute the current to the turn signal lights for the driver's purpose.
Figure 3.3. Schematic diagram of a turn signal circuit without a hazard switch
1. Battery; 2. Electric lock; 3. Turn signal relay; 4. Turn signal switch; 5. Turn signal lamp; 6. Turn signal lamp; 7. Hazard switch
Figure 3.4 Schematic diagram of turn signal circuit with hazard switch
1. Battery; 2. Combination switch cluster; 3. Turn signal;
4. Turn signal light; 5. Turn signal relay
Today's cars no longer use three-pin turn signal relays (B, L, E) but use eight-pin turn signal relays (figure 3.5) (pin number 8 is used for hazard lights).
For this type, the current supplying the turn signal lights is supplied directly from the turn signal relay to the lights.
div.maincontent .p { color: black; font-family:"Times New Roman", serif; font-style: normal; font-weight: normal; text-decoration: none; font-size: 14pt; margin:0pt; } div.maincontent p { color: black; font-family:"Times New Roman", serif; font-style: normal; font-weight: normal; text-decoration: none; font-size: 14pt; margin:0pt; } div.maincontent .s1 { color: black; font-family:"Times New Roman", serif; font-style: normal; font-weight: normal; text-decoration: none; font-size: 13pt; } div.maincontent .s2 { color: black; font-family:"Times New Roman", serif; font-style: italic; font-weight: normal; text-decoration: none; font-size: 14pt; } div.maincontent .s3 { color: black; font-family:"Times New Roman", serif; font-style: normal; font-weight: normal; text-decoration: none; font-size: 14pt; } div.maincontent .s4 { color: black; font-family:"Times New Roman", serif; font-style: normal; font-weight: normal; text-decoration: none; font-size: 13pt; } div.maincontent .s5 { color: black; font-family:"Times New Roman", serif; font-style: normal; font-weight: normal; text-decoration: none; font-size: 13pt; vertical-align: 1pt; } div.maincontent .s6 { color: black; font-family:"Times New Roman", serif; font-style: normal; font-weight: normal; text-decoration: none; font-size: 11pt; } div.maincontent .s7 { color: black; font-family:"Times New Roman", serif; font-style: normal; font-weight: normal; text-decoration: none; font-size: 14pt; vertical-align: -9pt; } div.maincontent .s8 { color: black; font-family:"Times New Roman", serif; font-style: normal; font-weight: normal; text-decoration: none; font-size: 11pt; } div.maincontent .s9 { color: #008000; font-family:"Times New Roman", serif; font-style: normal; font-weight: normal; text-decoration: none; font-size: 14pt; } div.maincontent .s10 { color: black; font-family:"Times New Roman", serif; font-style: italic; font-weight: normal; te
Car body electrical practice - 8
zt2i3t4l5ee
zt2a3gs
zt2a3ge
zc2o3n4t5e6n7ts
If the voltage is out of specification, replace the wire or connector.
If the voltage is within specification, install the front fog light relay and follow step 5.
Step 5 Check the front fog light switch
- Remove the D4 connector of the fog light switch
- Use a multimeter to measure the resistance of the front fog light switch.
Measurement location
Condition
Standard
D4-3 (BFG) -D4-4 (LFG)
Light switchFront Fog OFF
>10kΩ
D4-3 (BFG) -D4-4 (LFG)
Front fog light switchON
<1 Ω
- Standard resistor
D4 connector is located on the combination switch assembly.
If the resistance is out of specification, replace the combination switch (the fog light switch is located in the combination switch).
If the resistance is within specification, follow step 6.
Step 6 Check wiring and connectors (front fog light relay-light selector switch)
- Disconnect connector D4 of the combination switch assembly
- Use a voltmeter to measure the voltage value of jack D4 on the wire side.
Measurement location
Control modecontrol
Standard
D4-3 (BFG) - (-) AQ
TAIL
11 to 14 V
D4 connector for the wiring of the combination switch assembly
If the voltage does not meet the standard, replace the wire or connector.
If the voltage is within standard, there may have been an error in the previous measurements.
Step 7 Check the front fog lights
- Remove the front fog light electrical connector.
- Supply battery voltage to the fog lamp terminals
Jack 8, B9 of front fog lamp on the electrical side
blind first.
Power supply location
Terms and Conditions
Battery positive terminal - Terminal 2Battery negative terminal - Terminal 1
Fog lightsbefore morning
- If the light does not come on, replace the bulb.
If the light is on, re-plug the jack and continue to step 8.
Step 8 Check wiring and connectors (relay and front fog lights)
- Disconnect the B8 and B9 connectors of the front fog lights.
- Use a voltmeter to measure voltage at the following locations:
Measurement location
Switch location
Terms and Conditions
B8-2 - (-) AQ
Electric lock ON TAIL size switchFog switch ON
11 to 14 V
B9-2 - (-) AQ
Electric lock ONTAIL size switch Fog switch ON
11 to 14 V
B8 and B9 connectors on the front fog lamp wiring side
Voltage is not up to standard, repair or replace the jack. If up to standard, there may have been an error in the measurement process.
2.2.4. Procedure for removing, installing and adjusting fog lights 1. Procedure for removing
- Remove the front inner ear pads
Use a screwdriver to remove the 3 screws and remove the front part of the front inner ear liner
-Remove the fog light assembly
+ Disconnect the connector.
+ Use a screwdriver to remove 3 screws to remove the fog light cover
2. Installation sequence
-Rotate the fog lamp bulb in the direction indicated by the arrow as shown in the figure and remove the fog lamp from the fog lamp assembly.
-Rotate the fog light bulb in the direction indicated by the arrow as shown in the figure and install the light into the fog light assembly.
- Use a screwdriver to install the fog light cover
-Install the electrical connector
Attention: Be careful not to damage the plastic thread on the lamp assembly.
- Install the front inner ear pads
Use a screwdriver to install the front inner bumper with 3 screws.
3. Prepare the vehicle to adjust the fog light convergence. Prepare the vehicle:
- Make sure there is no damage or deformation to the vehicle body around the fog lights.
- Add fuel to the fuel tank
- Add oil to standard level.
- Add engine coolant to standard level.
- Inflate the tire to standard pressure.
- Place spare tire, tools and jack in original design position
- Do not leave any load in the luggage compartment.
- Let a person weighing about 75 kg sit in the driver's seat.
4. Prepare to check the fog light convergence
a/ Prepare the vehicle status as follows:
- Place the car in a dark enough place to see the lines. The lines are the dividing line, below which the light from the fog lights can be seen but above which it cannot.
- Place the car perpendicular to the wall.
- Keep a distance of 7.62 m between the center of the fog lamp and the wall.
- Park the car on level ground.
- Press the car down a few times to stabilize the suspension.
Note: A distance of approximately 7.62 m is required between the vehicle (fog lamp center) and the wall to adjust the convergence correctly. If the distance of 7.62 m cannot be achieved, set the correct distance of 3 m to check and adjust the fog lamp convergence. (Since the target area varies with the distance, please follow the instructions as shown in the figure.)
b/ Prepare a piece of thick white paper about 2 m high and 4 m wide to use as a screen.
c/ Draw a vertical line through the center of the screen (line V).
d/ Set the screen as shown in the picture. Note:
- Keep the screen perpendicular to the ground.
- Align the V line on the screen with the center of the vehicle.
e/Draw the reference lines (H, V LH and V RH lines) on the screen as shown in the figure.HINT:
Mark the center of the fog lamp on the screen. If the center mark cannot be seen on the fog lamp, use the center of the fog lamp or the manufacturer's name mark on the fog lamp as the center mark.
H line (fog light height):
Draw a line across the screen so that it passes through the center mark. Line H should be at the same height as the center mark of the fog light bulb.
Line V LH, V RH (center mark position of left fog lamp LH and right fog lamp RH):
Draw two lines so that they intersect line H at the center marks.
5. Check the fog light convergence
a/ Cover the fog lamp or remove the connector of the other side fog lamp to prevent light from the unchecked fog lamp from affecting the fog lamp convergence test.
b/ Start the engine.
c/ Turn on the fog lights and make sure that the dividing line is outside the standard area as shown in the drawing.
6. Adjust the fog light convergence
Use a screwdriver to adjust the fog light to the standard area by turning the toe adjustment screw.
Note: If the screw is adjusted too far, loosen it and then tighten it again, so that the last rotation of the light adjustment screw is clockwise.
3. Self-study questions
1. Describe the operating principle of the lighting system with automatic headlight function
2. Describe the operating principle of the lighting system with the function of rotating headlights when turning
3. Draw diagram and connect lighting system on Hyundai Porter car
4. Draw diagram and connect lighting system on Honda Accord 1992
5. Draw the lighting circuit on a 1993 Toyota Lexus
LESSON 3 MAINTENANCE AND REPAIR OF SIGNAL SYSTEM
I. IMPLEMENTATION GOAL
After completing this lesson, students will be able to:
- Distinguish between types of signals on cars
- Correctly describe common symptoms and suspected areas causing damage.
- Connecting signal circuits ensures technical requirements
- Disassemble, install, check, maintain and repair the signal system to ensure technical requirements.
- Ensure safety in work and industrial hygiene
II. LESSON CONTENT
1. General description
The signal system equipped on cars aims to create signals to notify other vehicles participating in traffic about the vehicle's operating status such as: stopping, parking, braking, reversing, turning...
Signals are used either by light such as headlamps, brake lights, turn signals….. or by sound such as horns, reverse music….
Just like the lighting system. A signal system circuit usually consists of: battery, fuse, wire, relay, electrical load and control switch. Only some switches of the signal system are on the combination switch. The switches of other signals are usually located in different locations such as in the gearbox or brake pedal……
2. Maintenance and repair
2.1. Turn signals and hazard lights
The installation location of the turn signal is shown in Figure 3.1. The turn signal control switch is located in the combination switch under the steering wheel. Turning this switch to the right or left will make the turn signal turn right or left.
The hazard light switch is used when the vehicle has a problem while participating in traffic. When the hazard light switch is turned on, all the turn signals on the vehicle will light up at a certain frequency. The hazard light switch is usually placed separately from the turn signal switch (some old cars integrate the hazard and turn signal switches on the same combination switch cluster).
Figure 3.1 Turn signal switch Figure 3.2 Hazard switch
The part that generates the flashing frequency for the lights is called a turn signal relay. The turn signal relay usually has 3 terminals: B (positive power supply); E (negative power supply); L (providing the turn signal switch to distribute to the
lamp)
2.1.1. Circuit diagram
To generate the frequency for the turn signal, a turn signal relay is used in the turn signal circuit. The current from the turn signal relay will be sent to the turn signal switch assembly to distribute the current to the turn signal lights for the driver's purpose.
Figure 3.3. Schematic diagram of a turn signal circuit without a hazard switch
1. Battery; 2. Electric lock; 3. Turn signal relay; 4. Turn signal switch; 5. Turn signal lamp; 6. Turn signal lamp; 7. Hazard switch
Figure 3.4 Schematic diagram of turn signal circuit with hazard switch
1. Battery; 2. Combination switch cluster; 3. Turn signal;
4. Turn signal light; 5. Turn signal relay
Today's cars no longer use three-pin turn signal relays (B, L, E) but use eight-pin turn signal relays (figure 3.5) (pin number 8 is used for hazard lights).
For this type, the current supplying the turn signal lights is supplied directly from the turn signal relay to the lights.
div.maincontent .p { color: black; font-family:"Times New Roman", serif; font-style: normal; font-weight: normal; text-decoration: none; font-size: 14pt; margin:0pt; } div.maincontent p { color: black; font-family:"Times New Roman", serif; font-style: normal; font-weight: normal; text-decoration: none; font-size: 14pt; margin:0pt; } div.maincontent .s1 { color: black; font-family:"Times New Roman", serif; font-style: normal; font-weight: normal; text-decoration: none; font-size: 13pt; } div.maincontent .s2 { color: black; font-family:"Times New Roman", serif; font-style: italic; font-weight: normal; text-decoration: none; font-size: 14pt; } div.maincontent .s3 { color: black; font-family:"Times New Roman", serif; font-style: normal; font-weight: normal; text-decoration: none; font-size: 14pt; } div.maincontent .s4 { color: black; font-family:"Times New Roman", serif; font-style: normal; font-weight: normal; text-decoration: none; font-size: 13pt; } div.maincontent .s5 { color: black; font-family:"Times New Roman", serif; font-style: normal; font-weight: normal; text-decoration: none; font-size: 13pt; vertical-align: 1pt; } div.maincontent .s6 { color: black; font-family:"Times New Roman", serif; font-style: normal; font-weight: normal; text-decoration: none; font-size: 11pt; } div.maincontent .s7 { color: black; font-family:"Times New Roman", serif; font-style: normal; font-weight: normal; text-decoration: none; font-size: 14pt; vertical-align: -9pt; } div.maincontent .s8 { color: black; font-family:"Times New Roman", serif; font-style: normal; font-weight: normal; text-decoration: none; font-size: 11pt; } div.maincontent .s9 { color: #008000; font-family:"Times New Roman", serif; font-style: normal; font-weight: normal; text-decoration: none; font-size: 14pt; } div.maincontent .s10 { color: black; font-family:"Times New Roman", serif; font-style: italic; font-weight: normal; te
Male and female adults of the stick insects have different shapes and colors. Females are shaped like oyster shells, 1.5–2.25 mm long; the outer body is purple-brown to black with a gray border that closely resembles the color of the plant stem; underneath the “armor” the body of the female stick insects is cream to bright orange. Adult males are winged, have a bright yellow body; have 10 long, small antennae; 04 purple-black eyespots and no mouth. Adult stick insects do not feed and their main activity is to find a partner to mate with.
The eggs of the stick insect are oval, bright yellow and about 0.3 mm long. The eggs are laid separately and are covered and protected by the mother's body. The eggs hatch about 30 minutes to 3 hours after being laid. The female will only continue to lay eggs again when the previous batch has hatched. A female can lay up to 150 eggs during the egg-laying period which lasts from 2 to 3 months.
From the second instar larvae, the stick insects begin to differentiate between sexes and the waxy “armor” appears. The “armor” of the male larvae is snow-white, so the stick insects are also called citrus snow scale; while the “armor” of the female larvae is gray. The male larvae are about 1 mm long. The male larvae suck plant sap and are immobile, they only move after they finish the pupal stage and become winged adults.
The life cycle of female stick insects has 3 stages including egg, larva and adult. Meanwhile, the life cycle of male insects, in addition to the 3 stages mentioned above, also has pre-pupal stage and pupal stage.
g) He sucks
Noctuidae - Lepidoptera
In the Mekong Delta, the following species are commonly found:
- Ophideres fullonia Clerck, also known as Othreis fullonia Clerck
- Eudocima dividens Cramer, also known as Eudocima salaminia Cramer
- Artena dotata Fabricius, also known as Lagoptera dotata Fabricius
- Anua coronata Fabricius, also known as Ophiusa coronata Fabricius
- Anua tirhaca (Cramer)
- Anua triphaenoides (Walker)
- Rhytia hypermnestra (Stool)
- Platyja umminia (Cramer)
- Anomis flava Fabricius
- Ischyja manlia (Cramer)
- Erebus caprimulgus (Fabricius)
- Thyas honesta Hubner
- Mocis undata (Fabricius)
* Distribution : These moths are recorded as important pests in most citrus growing countries in the world.
* Host : larvae only eat wild plants, only adults attack fruits of plants such as oranges, apples, peaches, grapes, pineapples, bananas.
* Morphological and biological characteristics
+ Species Ophideres fullonia Clerck, also known as Othreis fullonia Clerck. He has a body length of 30 - 35 mm, wingspan of 80 - 100 mm. Wings
The front is brown with multicolored spots and streaks, in the middle of the back edge of the wing there is a yellow patch, from the outer edge of the wing there is a large black C-shaped spot. The sucking proboscis is black, pointed at the tip, hardened, with many spines and stiff hairs along about 1/3 of the length of the proboscis. The head and thorax are brown. The lower lip antennae are brown, the tip of the third antennal segment is blue. The legs are brown, the middle tibia segment has no spines and is covered with many very long hairs. A female butterfly lays from 200 to 300 eggs.
Eggs are spherical, about 1 mm in diameter, transparent. Incubation time depends on external conditions, can be from 2 - 3 days or 8 - 10 days and sometimes up to 14 or 15 days.
The caterpillar is slightly reddish brown, with red legs; the third to eighth segments on the back are brown. The eighth segment is raised high, with yellow spots on both sides. The caterpillar has five instars and develops in 4 to 5 weeks.
The caterpillars usually pupate in the soil or on plants by pulling leaves together and living inside. The pupae develop in 10 - 15 days.
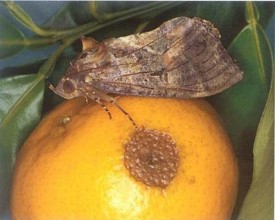
Figure 2.16: Adult Ophideres fullonia Clerck moth and damage symptoms
+ The species Eudocima lividens Fabricius is also known as Eudocima salaminia
Cramer
The body length is 30 - 35 mm, the wingspan is 75 - 85 mm. The forewings are light brown, with a curve from the tip slanting inwards to the base of the hind edge forming a purple-brown triangular patch, the outer edge of the wing is light brown, the inner part is white. The hindwings are apricot yellow, from the outer edge inwards, occupying 1/3 of the wing is a black patch, near the middle of the wing there is an arc-shaped black spot. The suction tube has a similar structure to the Ophideres fullonia species . The head and thorax are brown, the abdomen is apricot yellow.
Eggs are round, 1 mm in diameter, light green when first laid and gradually turn dark yellow when about to hatch, incubation period is about 3 days.
The larvae are dark brown, with many white spots on their bodies. The first to third abdominal segments have many yellow spots on both sides, and the second and third abdominal segments have eye-shaped spots on both sides, white in the center, and red-black around. The eighth abdominal segment is raised, with a pink back. The larvae have 6 instars.
- Instar 1: light green body, gradually turning dark green at the end of the instar, size from 4 - 8 mm.
- Instar 2: the body of the worm turns completely dark brown, with 2 round dots.
white on back and 4 small black spots on the sides, 9 - 15 mm long.
- Age 3: the body color of the worm is the same as age 2, but the 2 white dots on the back are longer and form a ring shape, and the 4 small black dots on the side gradually grow larger with age. Body size is from 12 - 24 mm.
- From age 4 to age 6: the caterpillar is dark brown, with small dots scattered on the body, these dots gradually become clearer; by the end of age 6, these dots are slightly bluish white, at the same time the 2 white dots on the back gradually grow larger and turn reddish brown at the end of age 6.
The development time of the worm from age 1 to age 5 is from 3 to 4 days, but the development time of age 6 is longer, about 6 days.
Pupae are black, similar in shape and color to the above species. Pupae develop from 16 - 18 days.
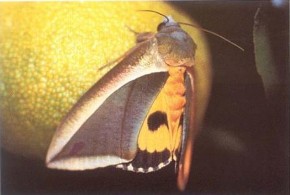
Figure 2.17: Sir Eudocima salaminia Cramer
+ Artena dotata Fabricius species
The moth has a body length of 30 - 37 mm, wingspan of about 70 mm. The sucking tip is not pointed, less stiff, along the length of the proboscis there are many stiff hairs. The whole body of the moth is dark brown.
The forewings are brown with a kidney-shaped pinkish-brown spot in the middle. The hindwings are dark brown with a white or light blue arc-shaped spot in the middle. The abdomen is brown. A female moth lays 40 - 45 eggs.
Eggs, larvae, and pupae have similar shapes and development times compared to other species.
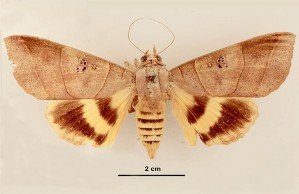
Figure 2.18: Sir Artena dotata Fabricius
+ Anua coronata Fabricius species
The butterfly has a body length of about 30 - 32 mm, wingspan of 70 - 80 mm. The forewings are brown, with large black kidney-shaped veins, the hindwings are orange-yellow, with 2 large black patches curved along the edge of the wing. The proboscis is developed, the tip is pointed, surrounded by many stiff hairs. The head and thorax are brown. The abdomen is yellow.
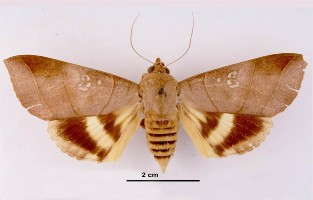
Figure 2.18: Sir Anua coronata Fabricius
* Living habits
These moths do not harm citrus trees but only eat unimportant vines, only the moths are harmful.
He is a nocturnal moth, flying from bushes into citrus orchards around 6-7pm and is most active between 8-10pm, flying away to find shelter when it is light. He is easily recognizable at night due to his luminous eyes and the shimmer of his wings. He is greatly attracted by the smell of ripe fruit. Therefore, he can fly long distances to reach places where ripe fruit is found.
* How to cause harm
These species cause a lot of damage to kumquats, mandarins, oranges... starting to appear around October - November and lasting until harvest. They are widespread and cause serious damage to kumquats. They damage fruits in two ways:
- Directly: when perched on the fruit, the moth begins to search for a suitable location to insert its proboscis into the fruit, sucking the fruit juice. If it cannot find a suitable location, it will pull out its proboscis and find another more suitable location. It is very difficult to detect a newly pricked fruit. If you see a hole in the proboscis, gently squeeze it with your hand and water will flow out.
- Indirect: the skin around the puncture site becomes soft after a few days and fungi and bacteria will invade next. The puncture site will be brown and the surrounding area will be lighter in color than normal. Finally, the fruit will turn yellow and fall off immediately or within a week. The fallen fruit will have a foul smell, the caterpillars do not like to eat it but it attracts them from afar.
* Factors affecting density
- He likes big, thin-skinned, juicy and sweet fruits.
- As for tangerines, he likes the Teochew tangerine variety the best.
- In the same garden, he prefers the outer rows of trees to the inner rows.
j) Thrips Scirtothrips citri Moulton
Family Thripidae - Order Thysanoptera
* Morphological and biological characteristics
Adults are orange-yellow, small, about 0.1 mm. A female lays about 25 eggs in leaves and young fruits.
The larvae are wingless, pale amber in color, with large abdomens on both sides, and have many very fine hairs on their bodies. The first instar larvae are very small, the second instar has a body size similar to that of adults, and begins to have antennae. At the end of the second instar, some drop to the ground to pupate, while others pupate in rolled-up leaves; at the third and fourth instars (pre-pupa and pupa stages with wing buds), this stage does not feed at all.
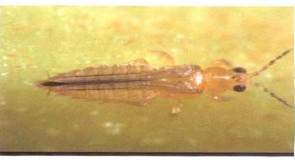
Figure 2.19: Adult thrips
* Living habits and harmful ways
Adults and larvae of the mite hide in the sepals and suck sap from the epidermal tissue of the fruit skin near the stem. When the fruit develops, light brown patches in a circular shape appear around the stem. The characteristic feature of the scars caused by the mite on the fruit is the scar rings around the stem. Later, the scars turn gray or silver. The fruit is most susceptible to scarring from the time after the petals fall until the fruit is about 4 cm in diameter. The scars reduce the commercial value of the fruit. The mite appears most concentratedly when citrus is in full bloom. The second instar causes the most damage because they mainly gather under the sepals of young fruit and their bodies are larger than the first instar. The mite mainly damages fruits in the open field.
Figure 2.20: Thrips damage on flowers and damage symptoms on fruits
On young leaves, Bù lách sucks and causes the leaf blade near the main vein to have thick stripes on both sides of the leaf; the leaves often become crooked when developing.
1.2. Important insect pests on mango trees
a) Leaf-cutting beetle Deporaus marginatus Pascoe
Family Curculionidae - Order Coleoptera
* Morphological and biological characteristics
Adults are beetles, 5 - 8 mm long, with a beak nearly half as long as their body. The head, chest and abdomen are red, the antennae, wings and legs are brown. A female adult lays 70 - 200 eggs.
Eggs are laid in the fleshy part of the upper surface of the midrib, about 0.5 cm from the tip of the leaf. Eggs are about 0.5 mm long, and incubation takes 2 to 3 days.
Larvae have 3 instars, developing from 6 - 10 days.
Pupae are formed in the soil and develop for 10 - 15 days.
Figure 2.21: Leaf-cutting beetle adults and larvae
* Living habits and harmful ways
After laying eggs, the adult larva cuts the leaf, the cut is 5 - 10 cm long from the base of the stem and is very sharp, looking like the leaf was cut with a knife or scissors. The cut part of the leaf will fall to the ground. The hatched larva will live right on the part of the leaf that falls to the ground, when big enough, it will burrow into the ground to pupate.
Adults emerge when the mango has young leaves and damage the mango tree in two ways:
- Eating young leaves makes the tree lose strength.
- The tree loses leaves, the growing tip is stimulated, the tree sprouts many new shoots, affecting fruit production.

Figure 2.22: Damage caused by adult leaf-cutting beetles
b) Mango leafhopper Idiocerus niveosparsus Lethierry
Green leafhopper family (Cicadellidae) - Order Homoptera
Mango trees are often attacked by many species of leafhoppers. In Vietnam, the main species found is Idiocerus niveosparsus Lethierry.
* Distribution and hosts